Here are some beginner guitar lessons to provide you with a great understanding of all the guitar basics. As you learn how to play the guitar, be sure to use proper hand and finger technique and don’t try to rush things. Play your guitar chords and notes cleanly. You will want to be sure that you don’t develop bad habits that can hinder your progress later on.
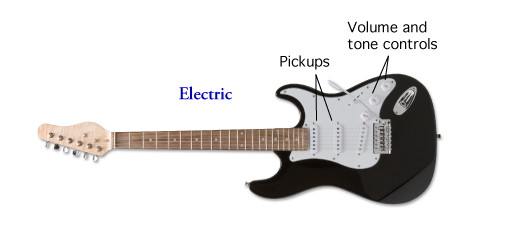
Types of Guitars and Parts of the Guitar
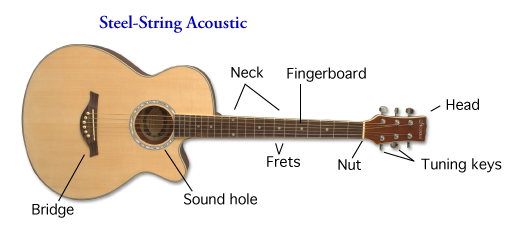
Let’s start out by learning about the different types of guitars and their parts. This lesson shows the differences between different types of acoustic guitars and also covers the electric guitar as well.
Tuning the Guitar
 Tuning your guitar is important, so that you can hear when you playing melodies and chords correctly as you work through your beginner guitar lessons. Learn how to tune a guitar using our online reference tuner. Or use our instructions for how to tune your guitar with a digital guitar tuner, if you have one of those.
Digital guitar tuners, such as the PitchBoy mini tuner (pictured to the left), or the eMedia Guitar Toolkit make tuning a guitar easier, as you can tune visually with less dependance on your own ear’s ability to hear pitch differences.
Holding the Guitar
 Learning how to hold the guitar correctly will make it a lot easier to practice and perform for longer periods of time. This guitar lesson will show you the right way to hold the guitar in sitting and standing positions.
Right Hand Guitar Technique
The right hand is used to make the guitar string vibrate by touching the string with your fingers, thumb and/or guitar pick. The right hand should rest comfortably on the guitar, with the hand basically parallel to the front of the instrument. The main right-hand guitar techniques are:
How to Strum a Guitar
Here is a strumming lesson that shows you the different ways of strumming a guitar. How you strum guitar chords determines your overall guitar tone when playing a song.
How to Hold a Guitar Pick
One of a beginning guitar student’s biggest challenges is developing proper picking technique. This one part of learning how to play guitar will make learning songs easier, as different songs will require different picking techniques. Also as you learn scales, play lead guitar or want to play faster tempo chord progressions you will need faster picking capabilities. Learning how to hold the pick correctly enables that.
Fingerpicking
Finger style guitar (fingerpicking) is common in folk and classical styles, but has also been a crucial element in lots of pop songs as well. Even rock guitarists such as Jeff Beck and Lindsey Buckingham (of Fleetwood Mac) will employ fingerpicking guitar styles. This guitar lesson covers basic fingerpicking.
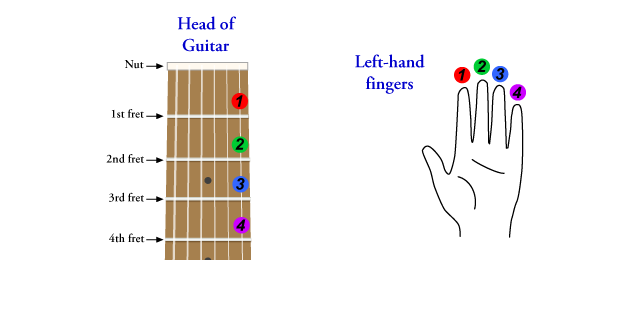
Left Hand Guitar Technique
Here are some things to observe when developing proper left hand technique for guitar. Those are:
Play With Thumb Parallel to the Neck and Arched Fingers
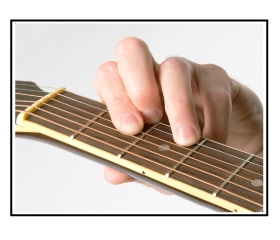 Your thumb should rest in the middle of the back of the neck, opposite your 2nd finger and vertical (perpendicular to the neck, not angled or parallel). Try holding your guitar neck with your left hand and then pull your hand down keeping your fingers slightly curved.
Keep space between the curve of your hand that is making the chord and the guitar neck. If you were to look at your hand from the end of your guitar (near the tuning machines), it should be in a “C” shape, with arched fingers.
Play On Your Finger Tips
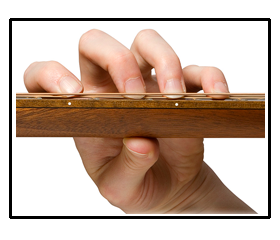 Make sure you play with the tips of your fingers, so that notes can ring out and not be accidentally muted. Do not let your finger flatten out when playing single strings.
There is generally a one finger per fret,
rule, that says all notes played on a particular fret should be played by the same finger across all strings on that fret. For example, if the 1st finger is on the 3rd fret, it plays all notes on the 3rd fret across all strings, the 2nd finger plays notes across the 4th fret, the 3rd plays the notes across the 5th fret and so on. Then as you move your hand up and down the neck you always have maximum reach with minimal movement. Very important when playing melodies and riffs at higher tempos.
Play Slightly Behind the Fret, and Don’t Press Too Hard
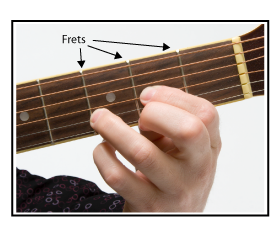 Your fingertips should press down just behind the frets (slightly towards the tuning machine end of the neck), and as close to the frets as possible without having your finger on the top of the actual fret. This will make it much easier to hold down the string to get a good tone. You should not need to press down very hard to make a note sound. If the note sounds muffled, your finger is probably on the fret and you need to move it back a bit.
If your left-hand fingernails are too long, they may need to be trimmed.
Paying extra attention to technique as you learn how to play guitar pays off greatly as you start to improve. Getting the basics right during your initial beginner guitar lessons pays off a lot in the long run.
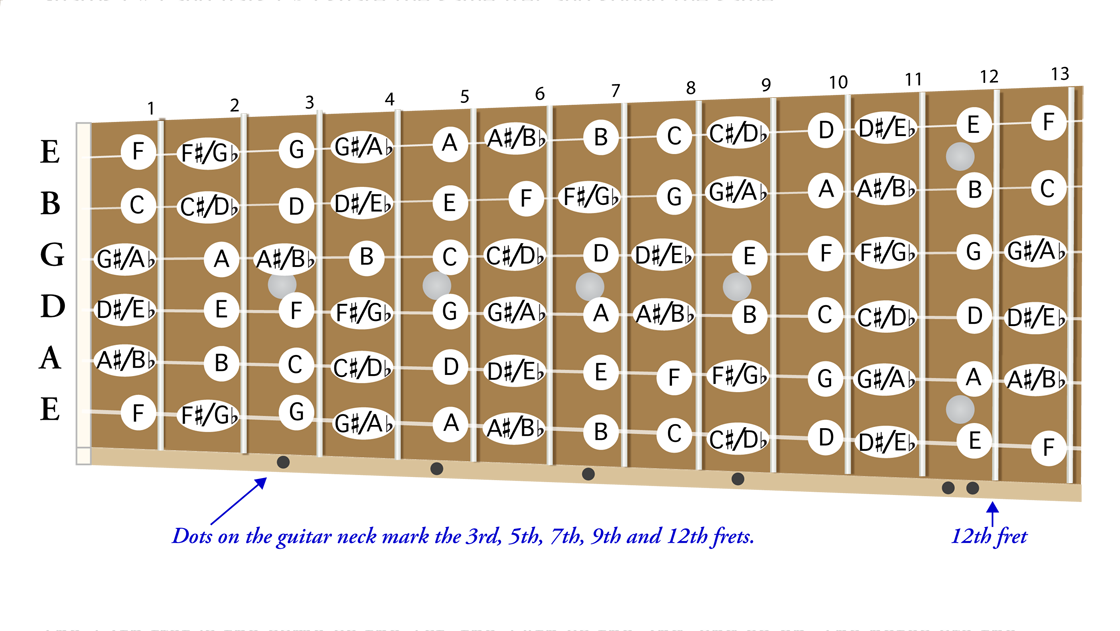
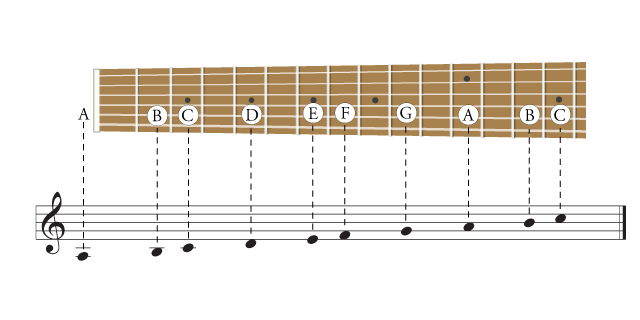
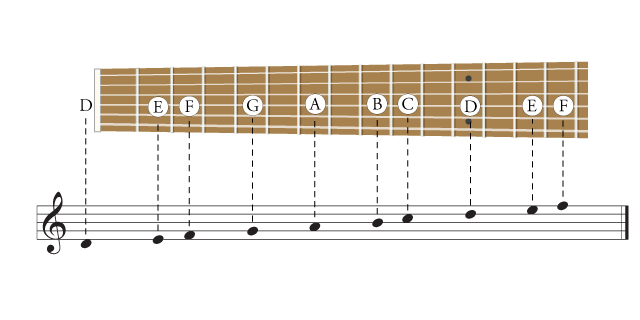
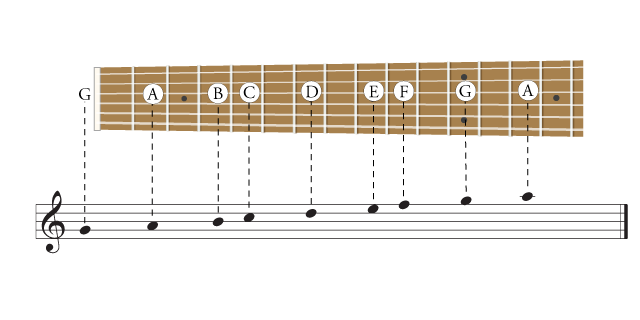
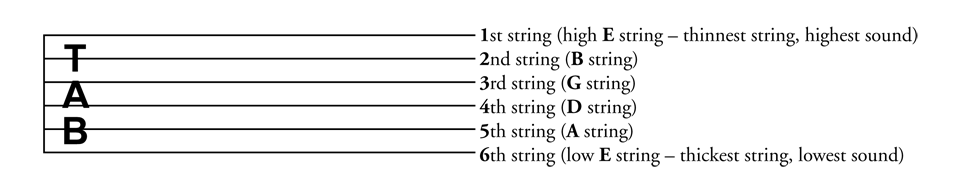
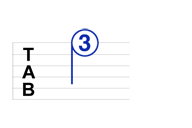
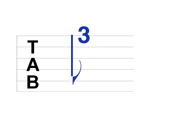
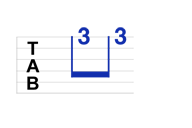
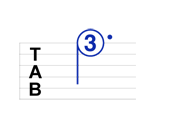
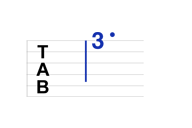
String and Finger Numbering
As seen in the graphic below, there is a guitar finger numbering system in place that indicates which finger to play relative to the frets. See the guitar fingering chart below for more information on guitar fingering notation.
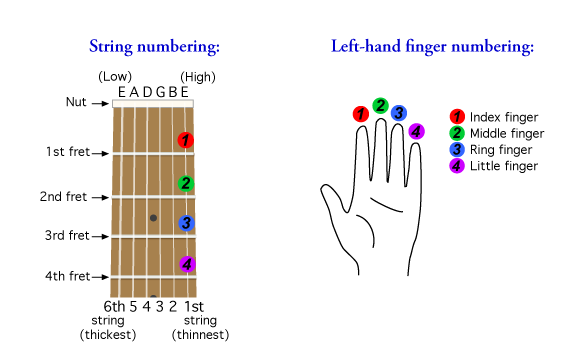
Note: The dots on the side and face of the guitar neck are placed before the 3rd, 5th, 7th, 9th, 12th, 15th, 17th and 19th frets. The 12th fret has two dots. These dots help you find your way on the neck.
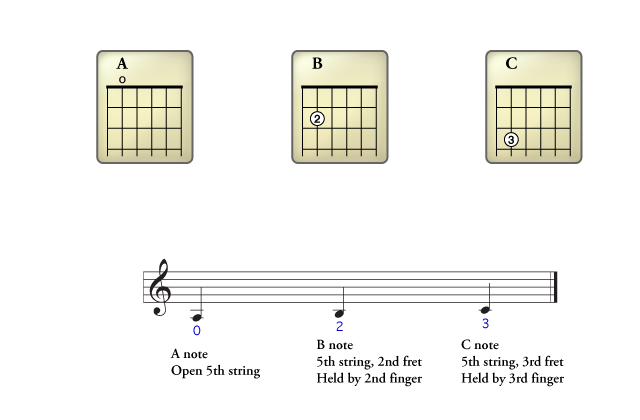
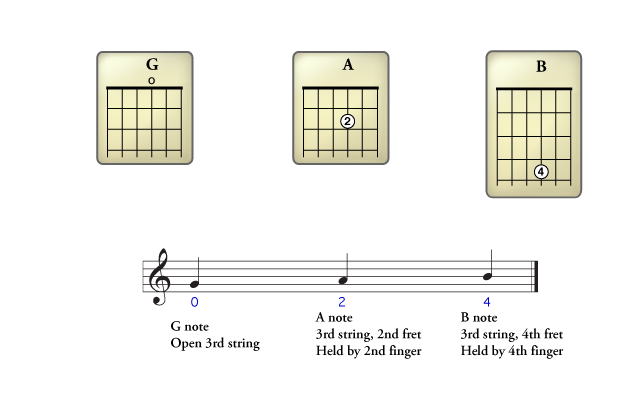
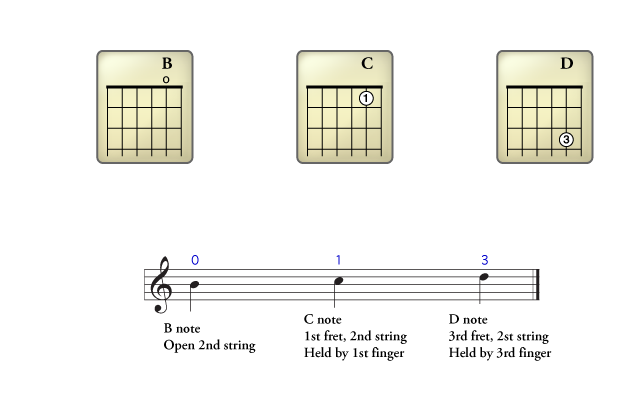
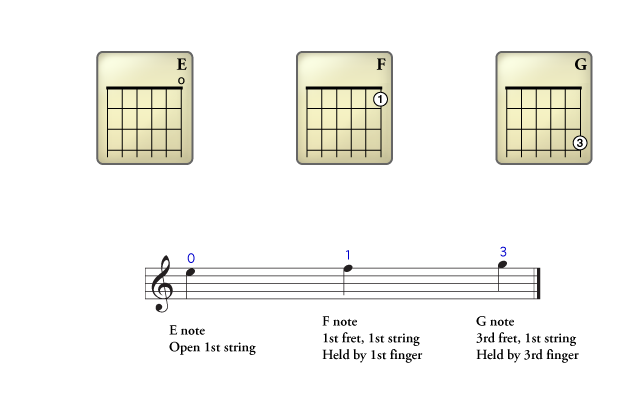
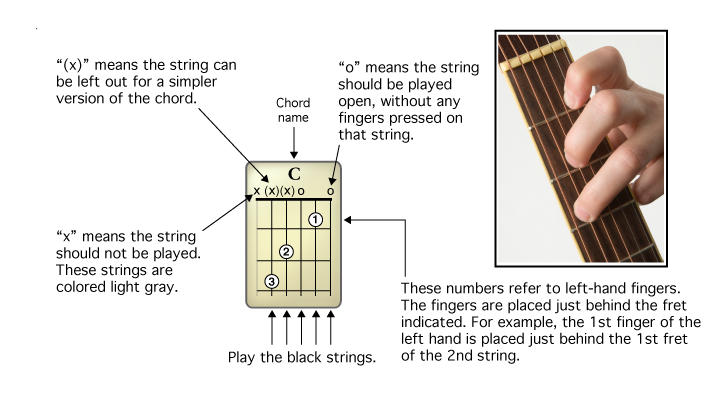
First Guitar Chords
The guitar chords below are called simple chords. They are perfect for beginner guitar lessons, as most of them only require a single finger and three strings to play. They are the most basic, easy guitar chords for beginners and work well for children with small hands, or others who might have problems playing full chords. Try playing them and remember to play all the notes in the chords.
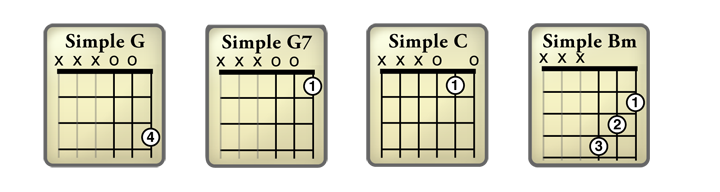
Here are some videos to help you learn some of these beginning guitar chords and beginner guitar songs that use them.
How to Play a Simple G Chord
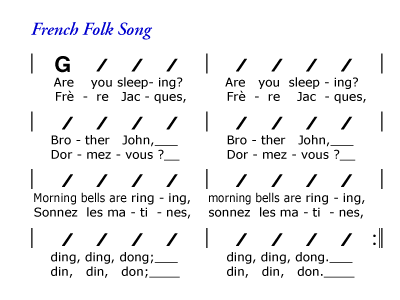
Beginner Guitar Song #1: Play Brother John/Frere Jacques
Now use your simple G chord to play this classic folk song. Each slash (/) indicates a downward strum on the beat. If possible, play to a metronome click so that you can to stay on the beat.
How to Play Simple C and G7 Chords
Once you master this beginner guitar lesson on chords, then make sure you know how to read guitar charts and go on to this free guitar lesson that teaches you more easy guitar chords. It also uses easy guitar chord charts and videos to help you learn even more chords easier.
Beginner Guitar Song #2: Play Skip to My Lou
Here is another song to try with the simple guitar chords you have learned.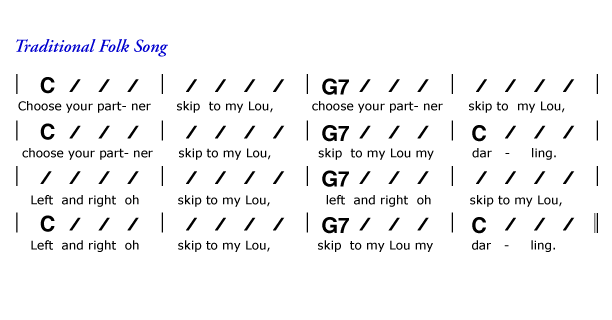
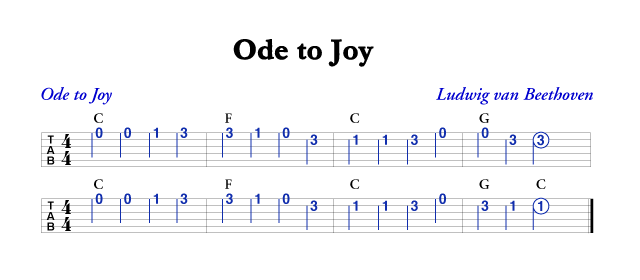
More Easy Beginner Guitar Songs
Once you master the simple guitar chords, you can play the easy guitar songs below. Start with the song below that only uses the Simple G, and then go to our carefully selected group of 10 easy guitar songs for beginners!
Tips for Practicing Guitar
Have a clear idea of what you need to practice. Simply playing the same two songs over and over will not make you progress. In general, consider putting time aside for these three areas:
- Improve guitar technique and strengthen your fingers. Remember that everyone needs to warm-up before playing and performing. Ways to do that effectively are to practice playing scales in different positions on the neck, changing between chords in common chord progressions, picking and fingerpicking, and playing in-tempo with a metronome. Start SLOWLY. Try to play CLEANLY without extra noise from accidentally hitting open strings, or accidentally muting notes by not holding down a note on the fret properly. Getting good tone will help make you a great player.
- Practice songs and repertoire. Once you are all warmed-up, now is the time to practice the songs you know. Don’t rush them, but make sure that you are cleanly changing chords, hearing all the notes, and playing it at tempo without pausing.
- Learn something new. Stretch yourself with a new technique, song, or musical style. Learn music theory and train your ear.
Learn Faster with eMedia’s Interactive Beginner Guitar Lessons!
 Guitar lesson software such as eMedia Guitar Method or eMedia Interactive Rock Guitar helps you learn how to play guitar faster. It provides a mix of great beginner guitar lessons by qualified teachers from leading music schools, and interactive music technology that gets you playing quickly. The Animated Fretboard and interactive guitar notation lets you see which notes to play, while the software listens to you and displays whether you’re actually playing the right note. Plus you learn hit songs like
 Knockin’ on Heaven’s Door
and Rock’n Me.
Beware of Common Practicing Mistakes
Here are some really common mistakes made by new guitarists. As you practice and learn how to play guitar please keep them in mind. Be patient, as mastering any instrument takes a lot of practice.
- Remember to tune your guitar first and warm-up your hands.
- Be patient.
- Practice slowly and watch your hands to have good guitar technique.
- Practice with a metronome to have a steady feel for tempo and keeping the beat.
- Change your chords on the the beat. Better to play slowly in rhythm than fast and miss a chord.


 Guitar lesson software such as