The Guitar Numbering System for Strings and Fingers

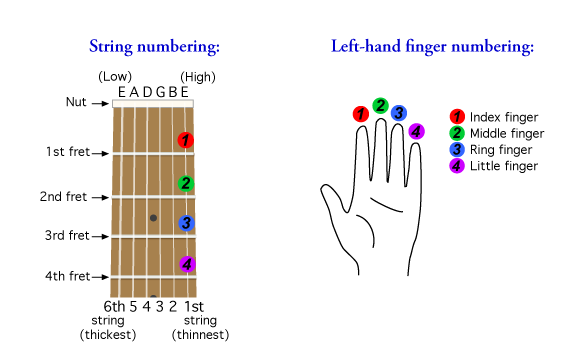
As seen in the graphic below, there is a guitar numbering system in place that indicates which finger to play relative to the frets. See the guitar fingering chart below for more information on guitar fingering notation.

Guitar Finger Numbering System

Note: The dots on the side and face of the guitar neck are placed before the 3rd, 5th, 7th, 9th, 12th, 15th, 17th and 19th frets. The 12th fret has two dots. These dots help you find your way on the neck.

Lessons from eMedia Music use the finger and string numbering systems shown above.


How to Strum a Guitar

Strumming is used for playing chords on the guitar. You strum with either the thumb, index finger or all the fingers across the strings in an up and down motion. With any of the strumming styles, the right arm rests on top of the guitar and the usual place to strum is just behind (toward the bridge) or over the sound hole. For an electric guitar, which doesn’t have a sound hole, the strumming is done over the pickups. This video shows you how to strum a guitar.

Receive over 180 beginner guitar lessons in eMedia Guitar Method.

Simple Guitar Chords for Beginner Guitar Students

Sometimes one person’s easy guitar chords are not so easy when you are a beginning guitar student. That’s why we include simple guitar chords with eMedia’s beginner guitar lesson software. The simple guitar chord voicings use fewer strings so they don’t require as much effort. This is perfect for the small hands of young kids, or those who might have a hand or finger condition (such as arthritis, broken fingers, etc.).

First Guitar Chords

The guitar chords below are called simple guitar chords. They are perfect for beginner guitar lessons, as most of them only require a single finger and three strings to play. They are the most basic, easy guitar chords for beginners and work well for children with small hands, or others who might have problems playing full chords. Try playing them and remember to play all the notes in the chords.

Basic Guitar Chords for Beginners
Easy Guitar Chords Charts

Here are some videos to help you learn some of these beginning guitar chords and beginner guitar songs that use them.

How to Play a Simple G Chord

[Excerpt from eMedia Guitar Method]

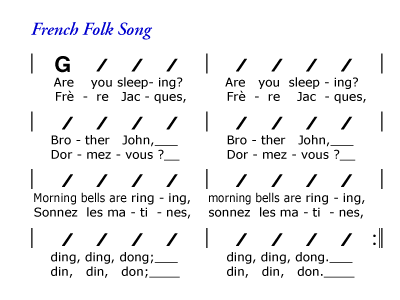
Beginner Guitar Song #1: Play Brother John/Frere Jacques

Now use your simple G chord to play this classic folk song. Each slash (/) indicates a downward strum on the beat. If possible, play to a metronome click so that you can to stay on the beat.

Easy Guitar Song Brother John

How to Play Simple C and G7 Chords

[Excerpt from eMedia Guitar Method]

Once you master this beginner guitar lesson on chords, then make sure you know how to read guitar charts and go on to this free guitar lesson that teaches you more easy guitar chords. It also uses easy guitar chord charts and videos to help you learn even more chords easier.

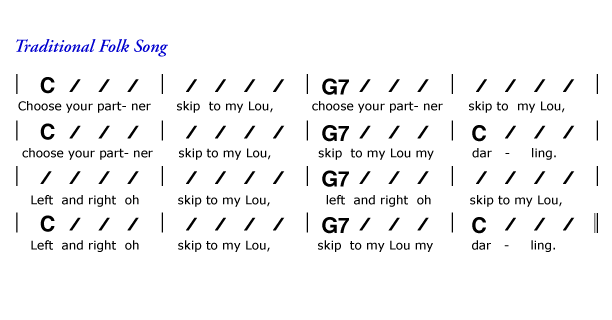
Beginner Guitar Song #2: Play Skip to My Lou

Here is another song to try with the simple guitar chords you have learned.Skip To My Lou Guitar Chords

More Easy Beginner Guitar Songs

Once you have mastered the simple guitar chords, you can play several easy guitar songs. Here is a carefully selected group of 10 easy guitar songs for beginners!

How to Hold a Guitar Pick

To learn how to hold a guitar pick, try making a loose fist and put the pick between your index finger and thumb. Don’t let too much of the pick be exposed as you need to control firmly as you strum and play individual notes. Here is a video to show you how to hold a pick.

Keeping a minimal amount of pick exposed also keeps it from being caught in the guitar strings and coming out of your hand. When using a pick, alternate between down and up strokes, giving each note a separate stroke. Thus the first note would get a down stroke, the second an up stroke, the third down, the fourth up and so on.

Over 180 beginner guitar lessons are ahead for you with eMedia Guitar Method.

Fingerpicking – How to Fingerpick on Guitar

This is the technique widely used by classical and folks guitarists. Here your hand rests above the guitar strings with the thumb roughly parallel to the strings and the rest of your fingers curved and plucking the strings perpendicularly. Note that some rock guitarists will use fingerpicking too. When using fingers (playing fingerstyle), pluck alternately with the index (i) and the middle (m) fingers. Thus use i for the first note, m for the second, i for the third, m for the fourth and so on.

Over 180 beginner guitar lessons are ahead for you with eMedia Guitar Method.

Left Hand Guitar Technique

Here are some things to observe when developing proper left hand technique for guitar…

Play With Thumb Parallel to the Neck and Arched Fingers

Left Hand Guitar Technique for Open Chords - SideYour thumb should rest in the middle of the back of the neck, opposite your 2nd finger and vertical (perpendicular to the neck, not angled or parallel). Try holding your guitar neck with your left hand and then pull your hand down keeping your fingers slightly curved.

Keep space between the curve of your hand that is making the chord and the guitar neck. If you were to look at your hand from the end of your guitar (near the tuning machines), it should be in a “C” shape, with arched fingers.

Play On Your Finger Tips

Proper Left Hand Guitar TechniqueMake sure you play with the tips of your fingers, so that notes can ring out and not be accidentally muted. Do not let your finger flatten out when playing single strings.

There is generally a one finger per fret, rule, that says all notes played on a particular fret should be played by the same finger across all strings on that fret. For example, if the 1st finger is on the 3rd fret, it plays all notes on the 3rd fret across all strings, the 2nd finger plays notes across the 4th fret, the 3rd plays the notes across the 5th fret and so on. Then as you move your hand up and down the neck you always have maximum reach with minimal movement. Very important when playing melodies and riffs at higher tempos.

Play Slightly Behind the Fret, and Don’t Press Too Hard

Left Hand Guitar Technique for Open Chords - FrontYour fingertips should press down just behind the frets (slightly towards the tuning machine end of the neck), and as close to the frets as possible without having your finger on the top of the actual fret. This will make it much easier to hold down the string to get a good tone. You should not need to press down very hard to make a note sound. If the note sounds muffled, your finger is probably on the fret and you need to move it back a bit.

If your left-hand fingernails are too long, they may need to be trimmed.

Paying extra attention to technique as you learn how to play guitar pays off greatly as you start to improve. Getting the basics right during your initial beginner guitar lessons pays off a lot in the long run.

Learn Faster with eMedia’s Interactive Beginner Guitar Lessons!

eMedia Guitar Method BoxGuitar lesson software such as eMedia Guitar Method helps you learn how to play guitar faster. It provides a mix of great beginner guitar lessons by qualified teachers from leading music schools, and interactive music technology that gets you playing quickly. The Animated Fretboard and interactive guitar notation lets you see which notes to play, while the software listens to you and displays whether you’re actually playing the right note. Plus you learn hit songs like Knockin’ on Heaven’s Door and Rock’n Me.

Beginner Guitar Technique

Here are some good lessons on guitar technique designed to help the beginner guitarist get started the right way. Remember to watch your hands and fingers in the early stages. As you learn how to play guitar you don’t want to develop any bad habits. It is much harder to fix problems with your technique later.

Right Hand Guitar Technique

The right hand is used to make the guitar string vibrate by touching the string with your fingers, thumb and/or guitar pick. The right hand should rest comfortably on the guitar, with the hand basically parallel to the front of the instrument.  The main right-hand guitar techniques are:

How to Strum a Guitar

Strumming is used for playing chords on the guitar. You strum with either the thumb, index finger or all the fingers across the strings in an up and down motion. See video for a demonstration. With any of the strumming styles, the right arm rests on top of the guitar and the usual place to strum is just behind (toward the bridge) or over the sound hole. For an electric guitar, which doesn’t have a sound hole, the strumming is done over the pickups. This video shows you how to strum a guitar.

[Excerpt from eMedia Guitar Method]

How to Hold a Guitar Pick

To learn how to hold a guitar pick, try making a loose fist and put the pick between your index finger and thumb. Don’t let too much of the pick be exposed as you need to control firmly as you strum and play individual notes. Keeping a minimal amount of pick exposed also keeps it from being caught in the guitar strings and coming out of your hand. When using a pick, alternate between down and up strokes, giving each note a separate stroke. Thus the first note would get a down stroke, the second an up stroke, the third down, the fourth up and so on. Here is a video to show you how to hold a pick.

Fingerpicking

This is the technique widely used by classical and folks guitarists. Here your hand rests above the guitar strings with the thumb roughly parallel to the strings and the rest of your fingers curved and plucking the strings perpendicularly. Note that some rock guitarists will use fingerpicking too. When using fingers (playing fingerstyle), pluck alternately with the index (i) and the middle (m) fingers. Thus use i for the first note, m for the second, i for the third, m for the fourth and so on.

[Excerpt from eMedia Guitar Method]

Left Hand Guitar Technique

Here are some things to observe when developing proper left hand technique for guitar. Those are:

Play With Thumb Parallel to the Neck and Arched Fingers
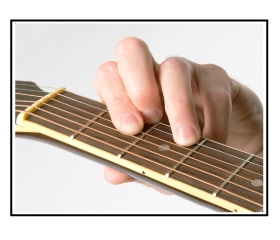
Left Hand Guitar Technique for Open Chords - SideYour thumb should rest in the middle of the back of the neck, opposite your 2nd finger and vertical (perpendicular to the neck, not angled or parallel). Try holding your guitar neck with your left hand and then pull your hand down keeping your fingers slightly curved.

Keep space between the curve of your hand that is making the chord and the guitar neck. If you were to look at your hand from the end of your guitar (near the tuning machines), it should be in a “C” shape, with arched fingers.

Play On Your Finger Tips
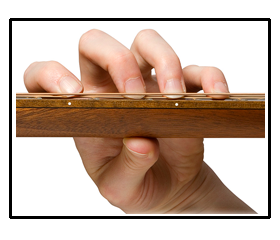
Proper Left Hand Guitar TechniqueMake sure you play with the tips of your fingers, so that notes can ring out and not be accidentally muted. Do not let your finger flatten out when playing single strings.

There is generally a one finger per fret, rule, that says all notes played on a particular fret should be played by the same finger across all strings on that fret. For example, if the 1st finger is on the 3rd fret, it plays all notes on the 3rd fret across all strings, the 2nd finger plays notes across the 4th fret, the 3rd plays the notes across the 5th fret and so on. Then as you move your hand up and down the neck you always have maximum reach with minimal movement. Very important when playing melodies and riffs at higher tempos.

Play Slightly Behind the Fret, and Don’t Press Too Hard
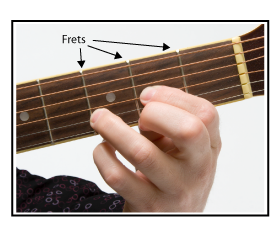
Left Hand Guitar Technique for Open Chords - FrontYour fingertips should press down just behind the frets (slightly towards the tuning machine end of the neck), and as close to the frets as possible without having your finger on the top of the actual fret. This will make it much easier to hold down the string to get a good tone. You should not need to press down very hard to make a note sound. If the note sounds muffled, your finger is probably on the fret and you need to move it back a bit.

If your left-hand fingernails are too long, they may need to be trimmed.

Paying extra attention to technique as you learn how to play guitar pays off greatly as you start to improve. Getting the basics right during your initial beginner guitar lessons pays off a lot in the long run.
How to Hold a Guitar

It is important to hold the guitar properly while playing it. This can affect your arm and hand position which is crucial to get right when learning how to play the guitar. Hold the neck with your left hand and pluck or strum the strings with your right hand. Keep the guitar face nearly vertical with the top inclined slightly toward the body. If sitting, try to sit straight — avoid bending over the guitar. Settle into a comfortable position and stay relaxed. The type of guitar you have affects how you sit or stand with the guitar. Here are some examples of good ways to hold different types of guitars.

Holding a Guitar in Sitting Position

How to Hold a Guitar in Sitting Position with Acoustic Guitar

(right leg crossed over left)

Classical Position

How to Hold a Guitar in Classical Position

(Left foot on raised platform)

How to Hold a Guitar in Standing Position

How to Hold an Electric Guitar in Standing Position

(With guitar strap)

Now that you know how to hold a guitar, you can start learning how to play guitar the easy way with eMedia Guitar Method!

Types of Guitars and Parts of the Guitar

Here is an overview of the different types of guitars and their parts. Note that some music styles require certain guitar techniques, and some guitars support those technique better than others. For example, the string bends done in blues and rock would be almost impossible on a classical guitar. This instrument is not designed for it, as string bends are not found in classical guitar repertoire. However, string bending is easy on an electric guitar, as they are built to support this technique.

Acoustic Guitars

Acoustic guitars are designed to make sound without amplification. Some might include a pickup, but they are still designed as acoustic instruments. Acoustic guitars are like hollow boxes made of thin wood, with a sound hole in the front underneath the strings. This allows vibration of the guitar strings to radiate sound waves into the guitar body, which then resonates. The front of an acoustic guitar (called a top) is usually made of softer woods like spruce that let the wood vibrate. The back and sides are usually hardwoods (mahogany, rosewood, etc.) to reflect sound back towards the sound hole.

Classical and Nylon-String Guitar

Classical GUitars The classical acoustic guitar is commonly used for playing classical music — usually with the fingers, though a pick is also sometimes used. Unlike the electric and steel-string guitars, which have metal strings, the classical guitar has nylon strings, which can be easier on the fingers. The neck of the classical guitar is slightly wider and, likewise, so is the spacing between the strings. You also find nylon-stringed guitars used in flamenco and folk music. You should never try to put steel strings on these instruments, as they have no reinforcement in their necks to deal with the extra tension. Listen to how the nylon string acoustic sounds below.

Steel String Acoustic Guitar

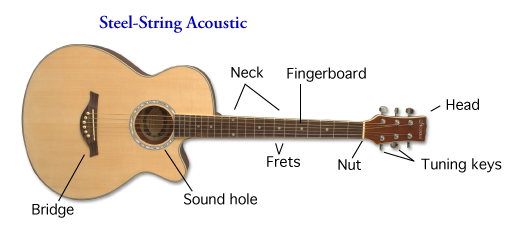
Steel-String Acoustic Guitar The steel-string acoustic is the most common acoustic guitar, and is perhaps the most versatile. As the name implies, it uses steel strings and is common in folk, country, blues, jazz, pop, and rock music. It can also sound great when playing classical pieces, but will be much brighter than a classical guitar. Steel-string acoustics are commonly strummed and played with a pick, but can also be played with the fingers using various fingerpicking techniques. Play below to hear how a steel-string acoustic guitar sounds.

Electric Guitars

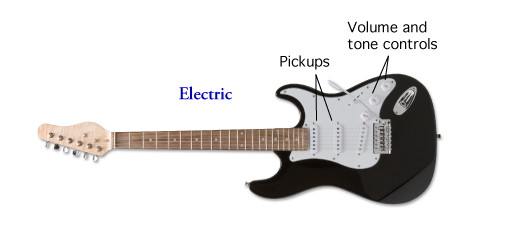
Electric Guitar The electric guitar is hooked-up to an electronic amplifier and can be adjusted to create different types of electric guitar tones. Electric guitars are used primarily in pop, rock, country, blues, R&B and jazz. While usually played with a pick, it can also be played with fingers. The strings are usually thinner than the steel-string acoustic and the necks a bit easier to play. As a result, electric guitars can be a great fit for beginner guitarists who prefer the previously mentioned music styles. Hear the electric guitar licks below for a taste of how the electric guitar sounds. Electric guitars are one of the most popular types of guitars.

How to Tune a Guitar

open string names for how to tune a guitarThis article will show you how to tune a guitar using our free online guitar tuner below. This online guitar tuner can be used in any browser, including those found on a mobile device.
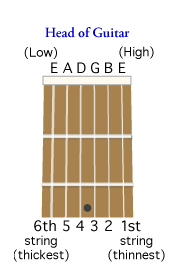
Start by learning the note names for the guitar strings in standard tuning. From the lowest (thickest) to the highest (thinnest) string, the notes are E-A-D-G-B-E. The phrase “Even Average Dogs Get Bones Easily” might help you remember the correct order as you learn how to tune a guitar in this lesson.

Steps for How to Tune a Guitar

  1. Click on a note name button in the guitar tuner (above) to hear the reference pitch for that guitar string.
  2. Play the corresponding string on your guitar and listen carefully to hear whether it sounds higher or lower than the reference pitch.
  3. Adjust the pitch of the string higher or lower until the sound you hear matches the reference pitch from the tuner.

Electric and Nylon String Guitar Tuner ExamplesGuitar Tuning Tips:
It’s best to start with the pitch a bit lower and tune the string up to the reference pitch. This helps keep the string from getting caught in the nut and going out of tune as you play.

Make sure you know how to tune a guitar string higher or lower in pitch. To adjust the pitch of a string lower, simply turn the tuning key for that string towards yourself. Turn the tuning key away from yourself to raise the pitch.

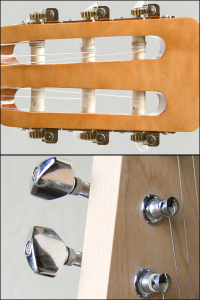
These instructions assume that your strings are wound around the tuning pegs in the standard direction. The pictures to the left illustrate how the string should be wound for steel-string and nylon-string guitars. To learn more about how strings should be wound see the how to string a guitar videos.

Other Types of Guitar Tuners

You’ve learned how to tune your guitar with our reference online guitar tuner. Next, you might want to try one of the other types of guitar tuners. A digital guitar tuner is the most popular option, as they detect the pitch and show you visually to tune up or down to get in tune with a high degree of accuracy. Note that eMedia’s intermediate and beginning guitar lesson software includes a wonderful digital guitar tuner, metronome, chord dictionary and audio recorder. Those guitar tools are also available as a standalone product for Mac and Windows as the eMedia Guitar Toolkit ($4.95). When you need a portable digital guitar tuner, there are products like the PitchBoy mini tuner that can fit on a keyring.

How to Tune a Guitar
using the Relative Tuning Technique

The relative tuning technique requires that one string is already in tune. Then you tune all the other strings to that string. To do this you must use your ear to match pitches, just as when you learned how to tune a guitar with the reference pitches above. You must also know which fretted notes are the same notes as the open strings you’re trying to tune.

Alternate Guitar Tunings – Low, Drop D, Open G and Others

Guitar players often change the tuning of the guitar in order to get a particular sound or combination of notes in a chord. These tunings are called alternate guitar tunings. Sometimes this is simply changing all the open strings higher or lower by the same number of steps (low tuning), changing one string lower (as in drop D tuning) or tuning all the strings to an open guitar chord (as in open G).