How to String a Guitar

String Corrosion Example
A picture showing string corrosion near the nut. Notice the string discoloration.

Before we jump into how to string a guitar, let’s first cover a few guitar string basics.

Use the Right Strings – Before you purchase a new set of strings for your guitar, make sure you know what type of guitar strings your guitar uses. Electric and steel-string acoustic guitars are built for using metal strings, but they use very different alloys and gauges. Classical and folk acoustic guitars are made for nylon strings, and, again, there are different types. Installing the wrong strings could ruin your setup or, worse, damage your guitar. Also thick guitar strings (medium and heavy gauge) are harder to hold down. For beginning guitarists it is usually best to start with lighter gauge strings, and go heavier as your hands get stronger.
Always Change Strings When They Are Worn – Guitar strings should be replaced regularly. As metal guitar strings age, they become corroded. Some last longer than others, but all guitar strings tend to lose their brilliance over time. If your guitar strings are really old or worn out, your guitar will sound dead and be more difficult to tune. Corroded strings can also be harder on your fingers.

What Tools Do I Need to Change Guitar Strings?

As you learn how to string a guitar properly, these basic tools will make it easier:

Strings

You will need a new set of strings that are appropriate for your guitar and style (see the list of guitar and string types below).
Guitar Strings

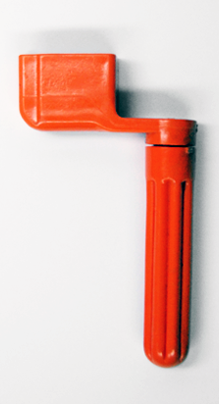
String Winder (String Crank)

An inexpensive string winder (or string crank) is indispensable. Without it, you’ll have to crank the guitar tuning key with your fingers — a very tiring task! Professional guitar shops have to change strings so often that they normally use battery-powered string winders. A standard guitar string winder usually features a special slot for pulling up bridge pins found on steel-string acoustic guitars. You’ll find a standard string winder in the eMedia Guitar Accessory Kit. These look similar to the pictures to the right. These tools crank on the guitar tuning key so that the string wraps around the tuning machine and gets tuned up to pitch faster.
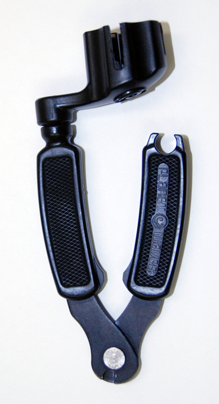
How to string a guitar tools - standard guitar string winder.
A standard string winder.

Wire Clippers

You don’t absolutely need a wire cutter, but without it you’ll end up with long tails on the end of each string that get in the way when you’re changing the other strings. Some companies make string winders with integrated wire cutters (see photo). Most wire cutters, snips, or pliers with snips will do the job. When clipping the end off the string try to leave about 1/2 inch.

How to string a guitar tools - String winder with string clipper
String winder with integrated clipper.

Steps for How to String a Guitar

For the step-by-step instructions on how to string a guitar like the one you own, please select the link below that corresponds to your guitar. These lessons will also have links to help you learn more about string types used for the individual guitar types.

How to String a Classical Guitar

Instructions for how to string a nylon string guitar. Useful for both classical and folk guitars.

How to String an Acoustic Guitar with Steel Strings

Here you learn how to change strings on a steel-string acoustic guitar. Be sure to read about acoustic guitar string types. Guitar string variations can greatly affect the sound and playability of your guitar.

How to Change Electric Guitar Strings

This gives you a great guide on how to string an electric guitar. To bend strings easier, select light gauge electric strings.

Tips for Changing Guitar Strings

Wash your hands before changing you guitar strings. Oils from your fingers make the strings corrode faster.

While your strings are off, you may wish to polish your guitar, particularly the neck and underneath where the strings are around the sound hole or pickups. You can remove the dust by wiping with a damp cloth. Remove dust by wiping with a cloth that has been sprayed lightly with guitar polish (also included in the eMedia Guitar Accessory Kit).

Ten Easy Guitar Songs for Beginners with Chord Charts

Playing some easy guitar songs is a great way to use the guitar chords and strumming patterns that you learn. It also it gives you some songs to play for your family and friends. These ten easy guitar songs for beginners with chord charts (and/or guitar tabs) and videos were selected using eMedia’s 20 years of experience in creating interactive, song-based guitar lesson software for beginners. Note that before you start learning these guitar songs you should make sure your guitar is in tune with a guitar tuner. Also it is good to use a metronome (as found in the eMedia Guitar Toolkit, which also includes a tuner) to help you keep a steady tempo.

Tom Petty - Free Fallin'

Free Fallin’ (Tom Petty)

A big hit that uses just three easy guitar chords played over and over. We help you see how to play the chords and make the changes smoothly.

Oasis - Wonderwall

Wonderwall (Oasis)

This huge 90’s hit from the band Oasis reached the top ten on 13 separate music charts.

Van Morrison - Brown Eyed Girl

Brown Eyed Girl (Van Morrison)

A pop/rock standard, Brown Eyed Girl is played in clubs and coffee houses worldwide. A simple song to strum and sing with only four chords.

Green Day - Good Riddenace (Time of Your Life)

Good Riddance (Time of Your Life) (Green Day)

This easy guitar song has become an anthem for graduations and proms. It’s chords are just G, C, D and Em.

Jimmy Buffett - Margaritaville

Margaritaville (Jimmy Buffett)

Released in 1977, this popular song is associated with a tropical, laid back lifestyle. Easy chords and a medium tempo.

House of the Rising Sun

House of the Rising Sun (Traditional)

An American folk song and a big hit for The Animals, this easy guitar song comes up often when musicians get together and jam.

House of the Rising Sun

Amazing Grace (Traditional)

A timeless classic with easy chord changes and a beautiful melody loved by millions.

Stand By Me

Stand By Me (Ben E. King)

The Stand By Me chord progression is used in countless other popular songs, from classic 50’s and 60’s pop onwards.

Wild Thing

Wild Thing (The Troggs and Jimi Hendrix)

First The Troggs made waves with this three chord rocker, and then Jimi Hendrix took it up a notch. Fun and rockin’!

Greensleeves

Greensleeves (Traditional)

This tradition celtic song can also be played as an easy Christmas guitar song.

If you want to learn more easy guitar songs, or simply learn how to play guitar better, be sure to look at eMedia guitar lesson software. From guitar lesson software for beginners to intermediate/advanced guitarists – eMedia’s award-winning music software uses courseware designed with highly-qualified, professional teachers. eMedia technology makes learning how to play guitar easier and more fun by using interactive guitar scores/tabs, an Animated Fingerboard, video, great songs and more. Watch this demo!

Learn How to Play Free Fallin on Guitar

This song was a big hit from Tom Petty’s Full Moon Fever album. To learn how to play Free Fallin on guitar, all you need to know are three easy chords and simple strumming patterns.

How to Play Free Fallin

  1. Listen to the song in the video above to remember how it goes.
  2. Get the guitar chords and lyrics for Free Fallin’. The music indicates to use a capo at the 3rd fret to put it in the key of F like the original. Don’t let this confuse you, as you still use the fingerings for the easy D, G and Asus4 chords (as seen below). Feel free to play it without a capo. Note that the G chord below is different than in the sheet music, to make playing transitions from D to G easier.Guitar Chord Diagram with Chords for
  3. Watch the video below to see how to play the chords and chord progression. It is good to use a metronome (as found in the eMedia Guitar Toolkit) to help you keep a steady tempo.

Watch this video from eMedia Interactive Rock Guitar, which uses the eMedia Animated Fretboard to make it even easier for you to see how to change between the D and G chords.

Rock-Guitar-v1-72dpieMedia Interactive Rock Guitar also helps you master common guitar techniques like palm muting and barre chords, which are used in the middle section of Free Fallin’ and in many other rock, pop and country songs. It also includes Jam tracks to help you learn lead guitar and other great guitar songs like Tired of Waiting for You and You Really Got Me (Kinks), All Right Now (Free) and others.

Intermediate Version

If you would like to learn how to play Free Fallin’ on guitar with the same chord voicings as Tom Petty, then you will need to use slightly more difficult chord fingerings. This version has the guitar with a capo at the first fret and uses special E, Aadd9, and Bsus4 chord voicings that let the high B and E strings ring out as seen in the video below.

How to Play Margaritaville on Guitar

Margaritavilleis the defining song of Jimmy Buffet‘s career. Reaching #8 on the Billboard Hot 100 chart in 1977, it also hit #1 on easy listening, and #13 on country charts as well. The song is also ranked 234th on the RIAA list of  Songs of the Century. The song was a mix of two subjects that included a drink he found at Lung’s Cocina del Sur restaurant in Austin, Texas, and his observance of the first wave of tourism into Key West, Florida. It forever made him the voice of those wanting to live the island live. To learn how to play Margaritaville on guitar, all you need to know are three easy chords and steady strum.

  1. Listen to the song in the video above so that you remember how it goes.
  2. Get the Margaritaville guitar chords and lyrics. This version shows you an A7 chord, but that is optional. You can just play an A chord in it’s place if you wish.The fingerings you need to know are for the standard open D, A, A7 (optional) and G chords. Note that on the original record, they sped up to the tape, so that the song sounds like it’s in E flat (Eb). But if you see Buffet in concert you can see that he plays it in D. Guitar Chord Diagram with Chords for
  3. Watch the video below to see how to play the chords and chord progression. It is good to use a metronome (as found in the eMedia Guitar Toolkit) to help you keep a steady tempo.

Watch this video from eMedia Interactive Rock Guitar, which uses the eMedia Animated Fretboard to make it even easier for you to see how to change between the D and G chords.

Rock-Guitar-v1-72dpieMedia Interactive Rock Guitar also helps you master common guitar techniques like palm muting and barre chords, which are used in the middle section of Free Fallin’ and in many other rock, pop and country songs. It also includes Jam tracks to help you learn lead guitar and other great guitar songs like Tired of Waiting for You and You Really Got Me (Kinks),  All Right Now (Free) and others.

Intermediate Version

If you would like to learn how to play Free Fallin’ on guitar with the same chord voicings as Tom Petty, then you will need to use slightly more difficult chord fingerings. His version has the guitar with a capo at the first fret and uses the E, Aadd9, and Bsus4 chords. as seen in the video below.

How to Play Wild Thing on Guitar

Wild Thing was written by James Wesley Voight, (better known by his stage name Chip Taylor) who is an American songwriter also known for his song Angel of the Morning. Wild Thing was a big hit for British band The Troggs in 1966, but also was played by other famous musicians including a great version by Jimi HendrixTo learn how to play Wild Thing on guitar, all you need to play are three easy guitar chords.

  1. Listen to the song in the video above so that you remember how it goes.
  2. Get the chords and words for Wild Thing. It is an easy guitar song that only uses A, D and E. It sounds great just using easy power chords, regular open chords or the Hendrix version uses an Asus4 chord instead of the standard A chord.Guitar Chord Diagram with Chords for
  3. Watch the video below to see how to play the chords and chord progression. It is good to use a metronome (as found in the eMedia Guitar Toolkit) to help you keep a steady tempo.

Watch this video from eMedia Interactive Rock Guitar, which uses the eMedia Animated Fretboard to make it even easier for you to see how to change between the D and G chords.

Rock-Guitar-v1-72dpieMedia Interactive Rock Guitar also helps you master common guitar techniques like palm muting and barre chords, which are used in the middle section of Free Fallin’ and in many other rock, pop and country songs. It also includes Jam tracks to help you learn lead guitar and other great guitar songs like Tired of Waiting for You and You Really Got Me (Kinks),  All Right Now (Free) and others.

Intermediate Version

If you would like to learn how to play Free Fallin’ on guitar with the same chord voicings as Tom Petty, then you will need to use slightly more difficult chord fingerings. His version has the guitar with a capo at the first fret and uses the E, Aadd9, and Bsus4 chords. as seen in the video below.

Learn How to Tune a Guitar with a Digital Tuner

A digital guitar tuner makes tuning your guitar easy. Once you learn how to tune a guitar with a digital tuner, you will probably only use this technique as it makes tuning your guitar so much easier. It listens to the note you play on your guitar via a microphone or guitar/line input or by sensing the vibration of the instrument as you play. Then it shows you visually whether the note is in tune. Visual feedback comes in a variety of forms from spinning dials to blinking lights to moving meters. The point of the feedback is always simply to inform you whether the string is in tune or you need to tune it up or down.

Steps for Tuning with a Digital Tuner

  1. Make sure you know the basics of How to Tune Your Guitar, such as the names of the notes in standard tuning.
  2. Set up your digital guitar tuner to detect pitch. If you have an electric guitar or electric acoustic, use the tuner line-in if possible to eliminate background noise. Use the method below that matches your tuner and guitar:
    LINE-IN: If your tuner features a 1/4″ input jack and your guitar features a pickup and 1/4″ output (all electric guitars and some acoustic guitars), plug an instrument cable between the two and make sure your volume knob is turned up on the guitar (if it has one).
    MICROPHONE: If your tuner has a microphone, place the tuner on a table in front of you or on your lap as you hold your guitar. If you have an electric guitar, place it in front of your amplifier. If you are using a software tuner, sit close to your laptop’s built-in microphone or place an external USB microphone in one of the positions already mentioned.
    CLIP-ON TUNERS: If your tuner is designed to detect vibration (all clip-on tuners), go ahead and clip it on the guitar headstock (the part of your guitar that has the tuning keys).
  3. Play a guitar string.
  4. Look at the tuner to see if the string is flat (too low in pitch), sharp (too high in pitch) or in tune.
  5. Adjust the pitch of the string up or down as indicated by the tuner using the guitar tuning key. Watch the guitar tuner display to make sure you’re adjusting the string in the appropriate direction.
  6. The tuner will show you when the string is in tune (the string light turns green, a center indicator is illuminated, etc.).

NOTE: It’s important to know which note you’re trying to attempting to tune and the order of the note names. The note names are ordered alphabetically and cycle to the beginning after “G.” In other words, A-B-C-D-E-F-G-A-B-C., etc. Some digital guitar tuners will confirm that you’re in tune, but you could be tuned to a “D” note when you’re attempting to tune the “E” string. You would have to tune up to get to “E.” The eMedia automatic tuner software is unique because it shows you how close you are to the standard tuning notes. This takes any guesswork out of tuning with a digital guitar tuner. Also note that many digital guitar tuners can operate as bass tuners as well. If you need a bass tuner, double check that the model you purchase has this ability.

Types of Digital Guitar Tuners

Software Tuners

Mac PC Guitar Tuner Software
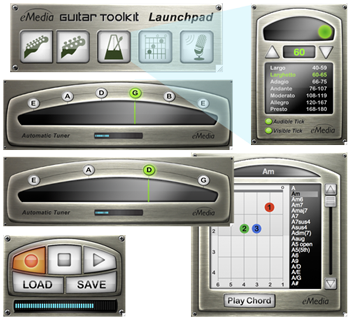
Digital tuners also come as software for Macs, PCs, and mobile devices. For example, eMedia intermediate and beginning guitar lesson software include a wonderful digital guitar tuner, metronome, chord library, and audio recorder, as does their $4.95 eMedia Guitar Toolkit.

You can also find guitar tuning apps for mobile devices, such as the iPhone.

Hardware Tuners

PitchBoy Digital Guitar Tuner
PitchBoy digital guitar tuner example.

Digital tuners can be dedicated hardware devices. For example, the PitchBoy digital tuner in the picture here is a great, basic digital guitar tuner that is only $9.95. It fits on a key chain, and even comes with eMedia Introductory Guitar or eMedia Introductory Bass lesson software. Other hardware tuners are available in many different configurations, from a number of companies.

Chromatic Tuners

Chromatic tuners can detect and display the names of all 12 notes in the Western musical scale (A-A#/Bb-B-C-C#/Db-D-D#/Eb-E-F-F#/Gb-G-G#/Ab) and are also available as hardware or software. Digital guitar tuners with a pitch display are chromatic tuners. Chromatic tuning is useful for tuning your instrument with alternate guitar tunings.

Some chromatic tuners track note ranges much higher and lower than those available on guitars and basses. This is why chromatic tuners are the standard tuner found in a school band or orchestra environment. The screen on the digital tuner might also display the frequency of the note (such as 440 Hz for an A note).

How to Tune a Guitar with Relative Tuning

Tuning the guitar with relative tuning requires that you have one string (preferably the low E) that you know is tuned to the correct pitch. You can tune the string by using a reference pitch from our free online guitar tuner or by using a digital guitar tuner. Once you have that string tuned, you can use that string to tune all the other strings using the relative tuning technique described below.

How To Tune A Guitar with Relative Tuning
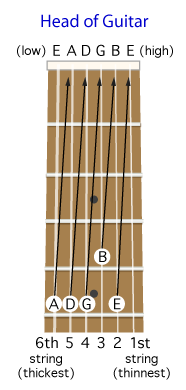
In relative tuning, open strings are matched to fretted notes of the same pitch on other strings, as seen in the chart here and description below.
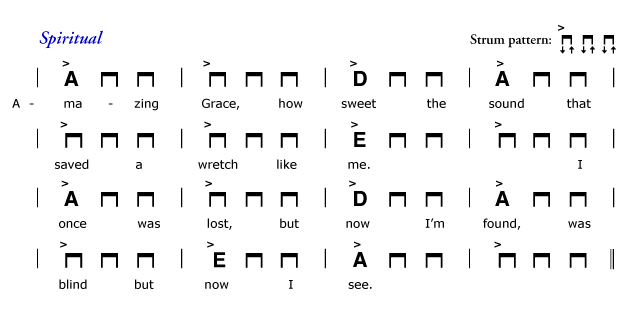
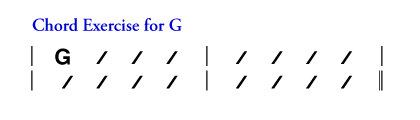
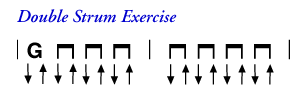
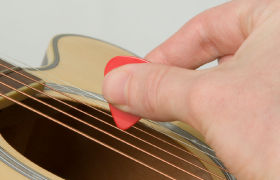
5th string played open = 6th string played with finger held behind the 5th fret.

4th string played open = 5th string played with finger held behind the 5th fret.

3rd string played open = 4th string played with finger held behind the 5th fret.

2nd string played open = 3rd string played with finger held behind the 4th fret.

1st string played open = 2nd string played with finger held behind the 5th fret.

Relative Tuning Process

  1. The relative tuning technique requires that you have already tuned your low E (the 6th, or thickest) string. You can use a reference tone such as a reference note tuner or a guitar that is already in tune.
  2. Play the low E string and turn the tuning key associated with that string to tighten/loosen the string until it matches the reference pitch.
    NOTE: If you’re having trouble matching the pitch, try loosening the string so you can hear it’s definitely a lot lower than your reference pitch, and then tighten the string until it’s in tune. You will hear the sound waver or “beat” slower and slower, the closer you get to being in tune. This wavering will stop when you are in tune.
  3. Fret the low E string at the fifth fret and play the string. You are hearing the note “A.” This becomes your next reference note.
  4. Play the A string (string 5) and adjust the corresponding tuning peg key until the sound you hear matches the reference pitch from the tuner
  5. Use the chart above to continue the process for each of the strings from lowest (thickest) to highest (thinnest).

Once you’re all tuned-up, try playing a few chords to make sure everything sounds right, and make adjustments as needed. Your ear will develop over time so that eventually you’ll be able to tune your guitar quickly.

How to Play Amazing Grace on Guitar

This time-honored classic has a beautiful melody, and is also an easy guitar song for beginners to play. Learn how to play Amazing Grace on guitar using the arrangement below taken from eMedia Guitar Method, the award-winning guitar lesson software that makes learning how to play guitar easier and more fun.

How to Play “Amazing Grace”

Listen to the song to make sure you remember the melody.

Learn the easy guitar chords seen below before you start learning how to play Amazing Grace on the guitar. This will make it easier for you to change between the chords. Don’t get frustrated, as it will get smoother. If you need help reading the chords below, go to this free guitar lesson on how to read guitar chords.
A Guitar Chord DiagramD Guitar Chord DiagramE Guitar Chord Diagram
Watch the video below to see how to play the chords in Amazing Grace and how to change from chord to chord. Remember to play slowly at first, and try to change chords fast enough to anticipate the next down beat. If you have a hard time changing your fingerings between any particular sets of chords, then practice changing between whatever sets of two chords over and over.
Now try slowly playing through the music below. It is good to use a metronome (as found in the eMedia Guitar Toolkit) to help you keep a steady tempo.

Easy Guitar Music for Amazing Grace

Easy Amazing Grace for Guitar

How to Read Guitar Chords

Learning how to read guitar chords is one of the first things you need to know when learning how to play guitar. This free guitar lesson will teach you how to read guitar chords (also called guitar chord diagrams), so you can learn any guitar chord.

Guitar chord dictionaries, such as the one in the eMedia Guitar Toolkit (which features over 250 chords, a digital tuner and a metronome for just $4.95), help you learn everything from basic guitar chords for beginners to more advanced chords, including jazz and barre chords.

The Basics of How to Read Guitar Chord Charts

Guitar Finger Numbers

Guitar notation and chord diagrams rely on a system which assigns guitar finger numbers to each finger of a guitarist’s left hand.

Guitar String Numbers

Guitar strings are numbered from 1 to 6, going from the thinnest string (the high E) to the thickest. When you see an O above the string it indicates that the string is to be played open. An X above the string means that it should not be played (i.e. do not pluck it or mute the string so that it so that it can not be heard).

Guitar Fret Numbers

Frets are represented by thinner, horizontal lines. Frets are numbered by starting on the first fret after the nut. The nut (a thick piece of plastic at the end of the guitar fingerboard) is shown as a thick horizontal line at the top of the chart when the nut is in view.How To Read Guitar Chords

How to Read Guitar Chord Names

Major Chords

When a chord is described by a letter name (for example, C) it is a major chord. In other words, C is the shorthand spelling of the C major chord.

Minor Chords

When the letter name of a chord has a lower-case “m” attached (for example, Cm), it is a minor chord. Thus, Cm is the shorthand spelling for the C minor chord.

Other Guitar Chords

If you see 7 attached to a chord name (for example, A7), it is a seventh or dominant seventh chord. A7 is the shorthand spelling of the A seven, A seventh, or A dominant seventh chord. These chords can also be major or minor. If there is an “M” in front of a number (for example, AM7) it is called a major seventh chord and a m signifies a minor seventh (as in Am7)Most other numbers you see next to chords (e.g., 6, 9, 11, 13) follow the same naming conventions for dominant, major, and minor variations. The abbreviations dim or aug attached to the letter names signify diminished and augmented chords, respectively.

Examples of Reading Guitar Chords

Now that we know guitar fingering, fret and string numbers we can use this information to decipher the guitar chord diagrams below.

How to Play an A Chord

In the open A example, we can see that we see that:

  • Our first finger holds down the fourth string (D) at the second fret
  • The second finger holds down the third string (G) at the second fret
  • The third finger holds down the second string (B) at the second fret
  • We do not play the low E string (X)
  • We play the high E and low A strings open (O)

Playing a D Major 7th (D Maj7 or DM7) Chord

In the D Maj 7 example, we can see how:

  • Our first finger holds down the first (high E), second (B) and third string (G) at the second fret
  • We do not play the low E string (X)
  • We play the A and D strings open (O)NOTE: This type of chord is sometimes referred to as a partial barre chord as one finger covers multiple strings

The C Dominant 7th (C7) Chord

In this example, you can read the chord chart as:

  • Our first finger holds down the second string (B) at the second fret
  • The second finger holds down the fourth string (D) at the second fret
  • The third finger holds down the fifth string (A) at the third fret
  • Our fourth finger (the pinky) holds down the third string (G) at the third fret
  • We do not play the low E string (X)
  • We play the high E open (O)

More About Guitar Chords

Use our website to learn a little more about guitar chord theory and how guitar chords are created. For a complete understanding of guitar chords plus how to play common chord progressions, check out eMedia Intermediate Guitar Method. This amazing, interactive guitar lesson software teaches you how to identify intervals and use guitar scales and chord theory to play great solos and master a wide range of styles. The guitar chord dictionary in eMedia Intermediate Guitar Method, as seen below, includes over 1,000 chords!

guitar chord dictionary

How to Strum a Guitar

Holding a Guitar Pickstrum is when one hand holds down the notes of a guitar chord, while the other hand plays across the strings to make the strings sound using a guitar pick, fingers or thumb. When you strum a guitar, the right arm rests on top of the guitar and the usual place to strum is over the sound hole or between the sound hole and bridge. For an electric guitar, which doesn’t have a sound hole, the strumming is between the pickups, or over them if the guitar has three pickups.

If using a pick for strumming, hold it between the thumb and index finger as illustrated here.

For strumming without a pick, strum with either the thumb, index finger or all the fingers. See the video below for a demonstration of how to strum a guitar with a pick, fingers or thumb.

How to Strum a Guitar with a Simple G Chord

Simple G Guitar Chord DiagramThe most basic guitar strums are on the downbeat where a chord changes. A popular beginning strum is to play using all downstrokes. A downstroke is when you strum with the pick downward and away from you. If you are familiar with musical notes, the rhythm will use all quarter notes (1/4 notes). Let’s try a basic strum using the Simple G chord to the right. If you need help reading the guitar chord chart, here is a free guitar lesson on to learn how to read guitar chords.

Strum the Simple G by playing three strings with either pick, fingers or thumb while holding the indicated string down behind the 3rd fret with your pinky (see video). Don’t press down too hard. Strum downward. Single strum is indicated by a single slash “/ .”

When chords change or a chord appears for the first time, its letter takes the place of the first slash, as in “G  /  /  / .”

The vertical bar lines (“|”) are not strums — they are used to indicate measures, which are sections with an equal number of strums. Note that here we have four strums in each measure.Chord Exercise for G.

How to Strum a Guitar with Simple G

Strum slowly at first, and try to keep a steady, regular speed. If you are having some trouble, watch this video on how to strum a guitar using the Simple G chord.

Because strums are rhythmic, it is good to practice them with a metronome. Metronomes (as the one here in the eMedia Guitar Toolkit)  can provide an audio click and visual indicator so you can stay on the beat.

How to Strum a Guitar Using the Double Strum

A very common way of playing the guitar is to use the double strum. After strumming down, as you did in the single strum, this time lightly brush the strings as you swing the hand back up. This is called an upstroke. The rhythm is now using eighth notes (1/8 notes). Usually you strum just the highest two or three strings on the up strum, although there is no hard and fast rule on this. This strum is notated as you see below.

Double Strum Guitar Excercise

To learn more guitar strumming patterns and styles check out eMedia Guitar Method. This award-winning guitar lesson software uses videos, interactivity, and great songs to make learning easy and fun.