Learn How To Play Greensleeves on Guitar

Learn How To Play Greensleeves on Guitar

Greensleeves is a song that calls to mind  Elizabethan England, and a time of formal courtships, and romanticism. Those who learn how to play Greensleeves on guitar can consider themselves carriers of the fine minstrel tradition that dates back centuries to the days of the lute. The song is based on an Italian style of composition and was even mentioned by Shakespeare in his play The Merry Wives of Windsor.

Learn how to play Greensleeves on guitar using this tab (guitar tablature) transcription below. If you need help learning how to read tabs, then check out this post for learning How to Read Guitar Tabs . A great way to learn this piece the fastest is by using eMedia Guitar Method. This guitar tutorial software contains over 180 lessons and lets you see the notes to play on an Animated Fretboard, and easily slow down and loop any difficult areas in songs or exercises. Plus you learn fingerpicking, chords, strums, and other skills. Also you get over 70 great songs and practice tools like an automatic tuner, metronome and chord dictionary.

Note that this song is in a 3/4 time signature, with a 1/4 note arpeggiation of the chords. As you learn how to play Greensleeves on guitar be sure to use the Right Hand Pattern outlined below to let you play the piece smoothly. Remember to start slow and build tempo as you can easily change chords without hesitation.

Guitar TABs for Greensleeves

The CAGED Guitar System

The CAGED guitar system is a way of understanding how to play guitar chords in all keys by knowing the fundamentals five basic open chord positions. As you might guess, the five open chords used as the basis of CAGED guitar are the open C, A, G, E and D.

CAGED guitar teaches that if you know how to play basic C, A, G, E and D open chord shapes (with minor and other variations), and can identify the root notes within those shapes, then you can play chords in any key. Also by knowing these shapes all around the guitar neck, you will have a better understanding of how the notes lay out on the guitar and access a huge variety of chord voicings while you play.

Basic CAGED Guitar Chords

First let’s look at the chord shapes with their fingerings. Note that if need to learn these basic CAGED chords, we cover some basic chords here. Also remember that  eMedia Guitar Method is the fastest way to learn these chords plus all of the other basics of playing the guitar.

Basic CAGED Guitar Chord FingeringsSome Basic Guitar Chord Theory – How Chords Are Made

A chord is three or more notes played at the same time with a certain relationship between the pitches of the notes. The relationship between notes is referred to as intervals. For example, a C major chord combines the first, third and fifth notes of the C major scale (C, E and G). Since the first note of the C scale was the initial starting point when adding the other intervals on top, the C note is called the root of the chord. This root note determines the name the chord (a C chord in this case). If the chord was formed by starting with a D, the chord would be a D chord, and so on. The notes of a chord can be rearranged, creating different positions of the same chord which are called inversions. Three-note chords built with a root, third, and fifth are called triads.

Find the Root

This guitar chord chart shows where the intervals are located in our CAGED guitar chords. R is for the root, is for the Third and 5 is for the Fifth. Knowing where the root is located is the key to being able to move the chord shape around the neck to quickly become a different chord.

A CAGED Guitar Chords Diagram With the Root

Move Chord Shapes to Create Chords in Different Keys

Now that you know where the root of the chord is, simply move (transpose) the chord up the neck and put the root note on a different fret. This creates the same type of chord in a different key. The approach will seem familiar to users of eMedia guitar lesson software as it is seen in the lessons on how to play barre chords and power chords. Those lessons show how to make E and A chord shapes into moveable barre chords. For example, the E shape becomes a G chord by simply moving the whole shape up and creating a barre with your finger on the third fret.

CAGED Guitar Chords Transposed

To move the shapes you will need to learn how to barre with your first finger. Basically you are using your finger the same way the guitar nut is used in the normal open chord voicing. Here is a video to illustrate creating a barre on the first fret and using the E shape to create an F chord:

Using this idea, you can see how only using a single chord shape can deliver that chord in any key. Memorizing these basic CAGED chord shapes, their roots and the notes on the fingerboard, lets you create moveable chords that help you play songs in any key.

Know Your Guitar Notes

Now that you have all this power to create new chords, remember that you have to know all the notes on the guitar. Knowing your guitar notes lets you easily see where to put the CAGED chord shapes to create a new chord. Memorize this chart below, and always remember that the notes are in a simple A, B, C, D, E, F, G sequence and then the notes start over again. Also remember that there are 2 frets between each note, except for B to C and E to F where the note pairs are only one fret apart.

Notes-Names-On-The-Guitar-120
A diagram showing where all the notes are on the guitar fingerboard.


 eMedia Guitar MethodeMedia Intermediate Guitar Method is a great way to learn your intervals, chords and scales. Created with University of Colorado-Boulder’s Kevin Garry, Ph.D., it uses flash card exercises to improve your ear and other interactive tools. Also you learn popular songs and use guitar theory to help you learn how to play guitar solos. It’s like having your own 24/7 private guitar instructor.

Types of Nylon Guitar Strings

Nylon String Example
An example of nylon strings, showing a wound and unwound/plain string.

Classical and folk guitars require nylon strings so it’s important to know the types of nylon strings available. Nylon strings have a softer, more mellow tone and are usually used in classical, flamenco, samba and folk styles. These types of guitars are lightly braced internally and do not have any extra reinforcement built into their necks. Note that these these types of guitars can’t handle the extra tension of metal strings so you should NEVER use metal strings on these types of guitars as you will bow the neck and/or pull the bridge off. Our article on how to string a classical guitar can show you how to change strings on these guitars.

Nylon string sets use 3 nylon/plastic, usually clear, strings for the high E, B, and G strings.  Low E, A, and D strings are wound with silver or brass around a nylon center.

Classical Guitar Strings

Nylon String Classical Guitar Bridge
The bridge of a classical guitar showing the string windings.

Classical guitar strings are plain on both ends. Installing them requires that you tie the string at the bridge by wrapping it around itself. Classical string sets will come as either normal/low-tension, moderate or high-tension which relates to your guitar neck’s ability to take different levels of stress. Beginning guitarists should purchase low-tension. This string set is the best-seller among all the types of nylon guitar strings available. The gauge (thickness) of a low-tension string is .028 of an inch. Higher tension strings are slightly thicker.

Folk Guitar Strings

Similar to classical, folk guitar strings feature three plain strings (usually black) for the lightest strings (G, B, and high E) and three wound strings. Folk strings are much lighter gauge (starting at .045 inch) than classical strings. Each folk string has a plastic ball on one end used to secure the string at the bridge.

Types of Acoustic Guitar Strings

Steel-String Acoustic Strings
Steel strings for an acoustic guitar.

This post will focus on varieties of metal strings available for steel-string acoustic guitars. If you have a classical, flamenco, or folk guitar, please read our post that covers types of nylon guitar strings.

Steel guitar strings have a bright sound popular in pop, rock, country, and folk styles. Steel-string acoustic guitars are constructed with a metal truss rod in the guitar neck to brace against the tension of metal strings. Do not install steel strings on any guitar designed for nylon strings. Since these instruments lack a truss rod, you might warp or break your guitar neck!

In a typical set of six guitar strings, the two thinnest strings are plain (bare steel) and the rest are wound. (Plain strings are sometimes called unwound.) Wound strings feature a metal alloy string wound around a steel core. A breakthrough in string design, winding two strings together creates a single, heavy thread that vibrates evenly so pitch can be clear and stable.

Bronze

The metal alloy called bronze, was traditionally a blend of 88% copper and 12% tin. In commercial bronze, zinc has replaced tin, and modern bronze acoustic guitar strings are actually a mix of bronze with other materials, such as phosphor, zinc and copper on a steel core.

80/20 and 85/15 Bronze or Brass Strings – The Brightest Sound

As the name suggests, two metals are blended to form an 80/20 alloy using a ratio of 80% copper and 20% zinc. This is known as low brass. You may already be familiar with the term brass if you know something about orchestral instruments. Some manufacturers have taken to calling these strings “80/20 bronze” even though these are not true bronze. You will also find sets with an 85/15 ratio, sometimes referred to as “Vintage Bronze”.

The tone of new 80/20 strings is brilliant but fades quickly to warm. A change in tone is not always desired by musicians, and this is why we have a variety of string options. Manufacturers of “coated” strings boast that their tone stays consistent much longer. This is true, but the tone of a coated string is not as bright to begin with.

Phosphor Bronze – Warm Sounding

Phosphor bronze strings combine copper with zinc, tin, iron, and phosphor. The strings are still mostly copper, but these other metals combine to provide a longer lasting tone than regular bronze. The tone is warmer with enhanced mids. These strings tend to hide finger noise and pick scrapes better than others. These guitar strings would sound good for jazz and softer styles.

Gold Plated – Medium Bright

Gold resists corrosion. While it seems extravagant, some players are willing to pay for gold-plated strings. Under the gold-plating is usually 80/20 bronze wound strings or phosphor bronze. These are somewhat popular with players who dislike the synthetically coated strings. Often these can be gold-plated 80/20 bronze wrap wire and phosphor bronze sets. The bright tone is said to last until the string breaks from old age.

Titanium – Medium Bright

Titanium strings are known for their resistance to corrosion. As they are not magnetic, titanium strings are not used with electric guitars. They offer a medium-to-bright tone, and can cost over 30X the cost of common bronze strings.

Silk and Steel String Sets

These strings sets use steel high E and B strings, with the remainder of strings made of bronze or brass windings over a nylon core. This makes for a softer sound than strings wound on a steel core. These strings are excellent for beginners because they are easier to play. These types of acoustic guitar strings are usually found on very lightly-braced acoustic guitars and on guitars that lack a truss rod.

Choosing Your String Gauge

When purchasing guitar strings, you’ll select a string gauge. The term gauge refers to thickness. The lighter the gauge, the brighter and weaker the sound. In contrast, heavier strings sound duller but project louder.

Your guitar has been set up by the manufacturer for a certain gauge of strings, probably light gauge. If you change the string gauge you may need to hire a guitar tech to adjust your guitar setup to maintain optimum playability. Most guitars ship with light or extra light strings, where the thinnest string is .012 or .011 millimeters thick.

Alternate Guitar Tunings

Guitar players will often change the tuning of the guitar in order to get a particular sound or combination of notes. These are called alternate guitar tunings. Sometimes this is simply changing all the notes higher or lower by the same number of steps, sometimes it is changing the tuning of just one string, and sometimes all the strings are tuned to an open chord.

Below are a few of the most commonly used alternate guitar tunings.

Low Tuning

This is where all the strings are tuned the same degree lower. This is commonly used because it works better for a vocal range and/or to make the guitar tone more bass-heavy and powerful. Occasionally you can find a song where all strings are tuned higher for the same reasons, however that is rare. Songs by U2, Van Halen, Nirvana, Queen, Jimi Hendrix and many others have used low alternate guitar tunings. Here are some of the most common low tunings:

  • Eb (E flat) – Tune all the notes down 1/2 step.
  • D – Tune all the notes down a whole step
  • C – Tune all the notes down 2 whole steps

Below is an example of Slash playing Knockin’ on Heaven’s Door in an Eb low tuning. The original version by Bob Dylan was in standard tuning and uses an A minor chord more often. Notice how the lower tuning and simpler chords in this version help to deliver a powerful rock rendition of the song. You can learn this song note-for-note, complete with the impressive Slash solo, by using eMedia Masters of Rock Guitar.

https://www.youtube.com/watch?v=X1ZRBPA8SK0&list=PLQSeuC5x-i7krPPD98a84W2Qnwt1Q_86n&index=1

Drop D Tuning and Other Drop Alternate Guitar Tunings

In “Drop” tuning one string (and occasionally more than one) is changed to create more interesting chord voices and to extend the range of the guitar to play lower-pitched guitar riffs. “Drop D” is the most common, where the low E string on the guitar gets detuned to a D (one whole step down). This alternate guitar tuning is used in everything from classical guitar music, to folk songs, to the grunge sounds of Nirvana and other rock bands.

A powerful aspect of playing in drop D is that you create a power chord by simply barring across the low E and A strings on any fret. As a result, it becomes very easy to make fast power chord progressions that would be impossible in standard tuning.

Here is Dave Grohl and the Foo Fighters with an acoustic version of Everlong that uses a drop D tuning. Listen to how he uses the low E and A string to create a chord progression that delivers power even on an acoustic guitar.

Open Tunings

Open tunings are when the strings are tuned in a particular sequence to play a particular chord when you simply strum all the open strings.  Often many notes are octaves of one another so it creates a very full sound with a strong drone. A drone, which is particularly popular in traditional Indian music, serves as a constant accompaniment note during a whole song and can impart an Eastern sound.

  • Open C – The C tuning has roots in English guitar, which uses open-notes of C-E-G-C-E-G. A variation of that (C-G-C-G-C-E) was used by folk guitarist William Ackerman, blues fingerpicking guitarist John Fahey. Mick Ralphs of the rock band Bad Company even used a version of the C tuning (C-E-G-C-E-C) for their song Can’t Get Enough.
  • Open D – Vestopol is another name for open D, which is tuned to D-A-D-F♯-A-D, also called tuning. Players that have used this tuning include Joni Mitchell, Bruce Cockburn, noted fingerstyle guitarist Leo Kotke, John Fahey and the Allman Brothers.
  • Open Dsus4 – Commonly called “DADGAD”, strings are tuned to D-A-D-G-A-D. Even though this is commonly called Celtic tuning, it is actually used in many styles of music. It is a versatile tuning as it sounds neither major nor minor. Popular opinion is that the tuning came about when an oud player in Morocco influenced British guitarist Davey Graham.
  • Open G – Variations on the popular open G include G-G-D-G-B-D, G-G-D-G-B-D, and D-G-D-G-B-D. One of the most well-known guitarists who depends on this tuning is Keith Richards of the Rolling Stones who has used it in many Stones hits.

One of the most popular songs in an open tuning is Led Zeppelin’s Kashmir. This hit is played in open Dsus4/DADGAD. All the droning D strings help to give this song its Eastern flavor.

In this excerpt from the excellent DVD It Might Get Loud  guitarist Jimmy Page shows the chords and tunings to Jack White of the White Stripes, and The Edge of U2. You can see from their interest, that alternate guitar tunings have created some legendary rock guitar parts.

How to String a Classical Guitar

Here are step-by-step instructions and a video to help you learn how to string a classical guitar. This technique also works for folk and flamenco nylon-string guitars.

Step-By-Step Guide: How to String a Classical Guitar

  1. Learn about guitar string basics and the types of nylon guitar strings available, and then purchase a set of nylon guitar strings.
  2. Remove one old string by loosening the string and then pulling the string gently off the tuning peg. It’s best to change strings one-at-a-time instead of removing all of the strings. Keeping some tension protects your guitar neck.
  3. Insert one end of the new string into the hole at the bridge. You will need about 1 1/2″ of the string available on the side opposite the sound hole.
  4. Bend the 1 1/2″ length of string back towards the sound hole and wrap it around the rest of the string (see picture below). Two times is preferred. Keep gentle tension on the long end of the string as you proceed with the next step to prevent the wrap from coming undone. When learning how to string a classical guitar you need to be sure the string is wrapped/tied-off securely. Note that with folk guitars, the folk strings have a plastic ball that goes through the bridge, so it does not require being tied.
  5. Locate the corresponding peg at the head of the guitar and wrap the loose end of the string around the peg once or twice.
  6. Insert the end of the string through the hole in the peg.
  7. Pull the end of the string through the hole.
  8. Turn the tuning peg away from you to tighten the string. Use a tuner to bring the string up close to pitch and avoid over-tightening the string.
  9. Once the string is close to pitch, move on to the next string. Wait until you are done changing all of the strings to attempt precision tuning.

How to String a Classical Guitar - Nylon String Classical Guitar Bridge

The bridge of a classical guitar showing the string windings.

Tune Up

After changing strings, it’s time to tune your guitar. New strings will stretch and need to be brought back up to pitch as you play. This is normal, as nylon strings stretch considerably more than steel strings. They will keep stretching for days, so don’t be alarmed if you need to retune several times until the strings stabilize. Here’s a post to help you learn how to tune your guitar. If you want a high-quality, inexpensive, digital guitar tuner to make tuning faster and easier, check out the PitchBoy. This amazing mini tuner is so portable that it even fits on a key chain!

How to String an Acoustic Guitar

Learning how to string an acoustic guitar helps you sound your best. Old strings sound dull and break more easily. So learning how to string an acoustic guitar is really important if you want to always sound your best.

Watch the video and read the step-by-step guide below to learn how to string an acoustic guitar with steel strings. If your guitar has nylon strings, read out post covering how to string a classical or nylon string acoustic.

Step-By-Step Guide: How to String an Acoustic Guitar

  1. Learn about guitar string basics and the types of acoustic guitar strings available, and then purchase a set of acoustic guitar strings to put on your guitar.
  2. Remove one old string by loosening the string and then pulling the string gently off the tuning key. It’s best to change strings one-at-a-time instead of removing all of the strings. Keeping some tension protects your guitar neck.
  3. Remove the string from the bridge by pulling the plastic bridge pin using a lever (the U-shaped slot cut into a string winder is made for this task).
  4. Insert the end of the new string with the metal ball into the hole.
  5. Replace the plastic pin so that it holds the new string down firmly.
  6. Locate the corresponding tuning key at the head of the guitar.
  7. Wrap the loose end of the string around the tuning key once or twice.
  8. Insert the end of the string through the hole in the tuning key.
  9. Pull the end of the string through the hole. It should look like the picture below.
  10. Turn the tuning key away from you to tighten the string.
  11. Use a tuner to bring the string up close to pitch and avoid over tightening the string.
  12. Once the string is close to pitch, move on to the next string. Wait until you are done changing all of the strings to attempt precision tuning.
How to String an Acoustic Guitar - Steel-String Acoustic Winding
A steel-string acoustic guitar tuning key displaying good string winding technique.

Time to Tune Your Guitar

After changing strings, it’s time to tune your guitar. New strings will stretch and need to be brought back up to pitch as you play. This is normal. Here’s a post to help you learn how to tune your guitar. If you want a high-quality, inexpensive, digital tuner to make tuning easy, check out the PitchBoy mini tuner that fits on a key chain.

About the Truss Rod

Guitars designed to use steel strings have a metal truss rod that runs through the guitar neck to counter-act the tension of steel strings pulling forward on the guitar neck.  If your guitar strings are very hard to press down, or are buzzing when you play notes and chords, you should have your truss rod adjustment checked by a qualified repair person.

How to Change Electric Guitar Strings

Use the video below and step-by-step instructions to learn how to change electric guitar strings.

Steps for How to Change Electric Guitar Strings:

  1. Learn about  guitar string basics and the types of electric guitar strings available, before you purchase your next set of electric guitar strings.
  2. Remove one old string by loosening the string and then pulling the string gently off the tuning key. It’s best to change strings one-at-a-time instead of removing all of the strings. Keeping some tension protects your guitar neck.
  3. Insert the end of the new string with the metal ball into the slot at the tailpiece or bridge. You may need to thread the string through a hole in the back of some guitars (such as tremolo style bridges shown below).

    Electric-Strat Bridge
    A common electric guitar tremolo bridge.
  4. Gently pull the string through until the metal ring at the other end clicks into place.
  5. Locate the corresponding tuning key at the head of the guitar.
  6. Wrap the other end of the string around the tuning key once or twice.
  7. Insert the end of the string through the hole in the tuning key.
  8. Pull the string through the hole.
  9. Turn the tuning key away from you to tighten the string. Use a tuner to bring the string up close to pitch and avoid overtightening the string.
  10. Once the string is close to pitch, move on to the next string. Wait until you are done changing all of the strings to attempt precision tuning.

Tune Up and Play!

After changing strings, it’s time to tune your guitar. New strings will stretch and need to be brought back up to pitch as you play. This is normal. Here’s a post to help you learn how to tune your guitar, If you want a high-quality, inexpensive, digital tuner to make tuning easy, check out the  PitchBoy mini tuner that fits on a key chain.

A Note About Your Truss Rod

Electric guitars are constructed with a metal truss rod  that runs through the guitar neck to counter-act the tension of steel strings pulling forward on the guitar neck. If the strings on the guitar buzz while being strummed, or if the strings are very hard to press down and a high distance from the guitar’s fingerboard, then you should have your truss rod adjustment checked by a qualified repair person.

How To Play House of the Rising Sun on Guitar

House of the Rising Sun is an American folk song with its roots in the deep south. While the exact origin and meaning of House of the Rising Sun (or Rising Sun Blues as it can also be called) can be argued, its deep emotion of loss and warning in the lyrics, and its plaintive, minor melody make it a classic. It was a huge hit in the 60’s for the The Animals, and today many instrumentalists and singers learn how to play House of the Rising Sun as it’s become a standard song to be played in jam sessions and at coffee houses.

House of the Rising Sun is an easy guitar song you can learn by using the music below.

How to Play “House of the Rising Sun” on Guitar

  1. Listen to the song in the video above to double hear how it goes. Don’t be put-off by the fast guitar arpeggios. The song sounds great using a standard strumming pattern.
  2. Learn how to play House of the Rising Sun guitar chords. As you can see, the song uses the standard open chords of Am, C, D, F and E. F can be a bit tricky, but we will help you learn it.
  3. Am Guitar ChordC Guitar Chord DiagramD Guitar Chord DiagramF Guitar Chord DigramE Guitar Chord Diagram

  4. The guitar music for House of the Rising shows chords, song lyrics and a tab (guitar tablature) transcription. If you need help learning how to read this special guitar notation, then check out this link for learning how to read guitar tabs.

Play this song with gradually building dynamics. Start with the first verse in a more quiet and solemn tone. Then build the angst in your performance as you get to the end where the singer agonizes over the bad choices and warns other to stay away from the House of the Rising Son.

House of the Rising Sun Guitar TABs

eMedia Guitar MethodLearn How to Play House of the Rising Sun
and Other Easy Guitar Songs

 eMedia Guitar Method is the best-selling  guitar lesson software that includes over 180 guitar lessons written by professional instructor Kevin Garry, Ph.D. It interactive technology lets you easily see the correct notes to play, slow down and loop difficult areas in songs and exercises, and learn chords, strumming, fingerpicking and other skills. Flash cards and videos keep your learning experience engaging, plus you learn over 70 great guitar songs.

How to Play Guitar Scales for Beginners

How to Play Guitar Scales for Beginners

This post will teach you how to play basic guitar scales.

Why You Should Learn How To Play Guitar Scales

Scales are a basic building block of music for all instrumentalists, singers, composers and those who want to improvise and play solos (as when playing lead guitar).

What makes a scale?

A scale (from the Italian word scala, meaning ladder) is a series of notes, either ascending or descending, with a particular interval between each successive note. Intervals indicate the distance between two pitches. Guitarists might think of this as the number of frets between notes. For example a whole step (W) is when two notes are two frets apart, and half steps (1/2) are when two notes are one fret apart. There are several different types of scales. Each scale has a distinct sound because of its unique arrangement of intervals. Here we will cover the most commonly used scales and the most commonly used positions of these scales. We will cover major and minor scales as well as the major pentatonic (country), minor pentatonic (rock) and blues scales.

Scale Types

The major and minor scales are based on modes. The seven modes are scales of an earlier origin, some of which are used today. We will focus on the most commonly used modes — Ionian, which is our major scale, and Aeolian, which is our natural minor scale. The pentatonic and blues scales are unique scales widely used in today’s music.

Scale Fingerings

There are two main scale fingerings, open and closed/moveable. Open scales include the use of open string. Closed, or moveable fingerings use no open strings. Closed scales, because they use no open strings, are movable — you can move them from one position to another to create the same scale in a new key. Also, if you use that same closed, moveable fingering you can create new scales by starting on a different scale step. For example, a closed fingering of a G major scale becomes an A major scale when the same fingering is played two frets higher. Also an A major closed fingering can be used to play a B dorian “mode” (a special type of scale) by simply starting the scale on the second step (the B note) instead of the A note. Although there is no hard and fast rule, different musical styles tend to rely more on one type of fingering than the other. For example, rock guitarists use more closed scales, whereas folk and bluegrass guitarists use more open scales.

Fingering System for Guitar Notes

Scale fingering diagrams will use numbers to indicate what fingers to use when playing the notes. Guitar-Note-Fingering-Chart

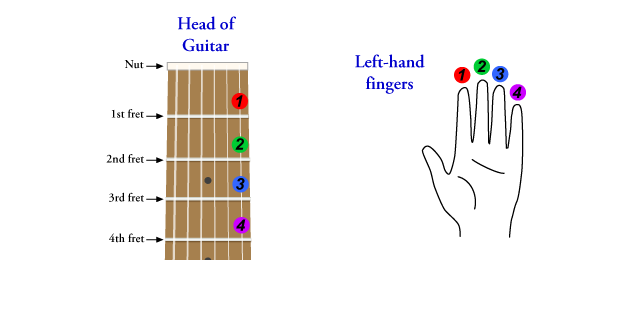
A graphic to show how left-hand fingerings are marked for reading guitar notes.

Remember to try and use the one-finger-per-fret rule when playing guitar notes. This will make playing the notes easier and help you develop great basic guitar technique. One-finger-per-fret means that wherever you place your hand on the guitar fingerboard, each finger will cover the notes sequentially up and down the fingerboard. As in the example above, you can see that the first finger would play all the notes found the first fret for all the strings; the second takes all the notes on the second fret; etc.  If the first finger was on the third fret, then then the second would play all the notes on the fourth fret, the third finger all the notes on the fifth fret, etc.

Hand and Finger Position When Learning How to Play a Guitar Scale

When learning how to play guitar scale, it is crucial to concentrate on your guitar playing technique. Good single note technique includes:

    • Keep your left-hand fingers curved
    • Play on your fingertips, as seen in this video
  • Play the guitar scale both going up and going down
  • When going up the scale, do not take your finger off of a note, until your finger is placed on the next note up on that same string
  • When going down the scale, have your finger covering the next lower note before you lift your finger from the higher note on the same string
  • Play using alternate picking
  • Aim for an even sound and smooth rhythm

The Major Scale

Here is a diagram that shows you how to play a major scale on guitar in the key of A major. It is a moveable scale shape, with the root being played by your first (1st) finger.

The Minor Pentatonic Scale

Here is a diagram that shows you how to play the pentatonic scale on guitar. It is on of the most common scales for rock guitar and other music styles that use power chords and/or minor chords.

The Major Pentatonic Scale

This diagram shows how to play the major pentatonic scale on the guitar in the key of A major. It is a moveable scale shape, with the root being played by your fourth (4th) finger.
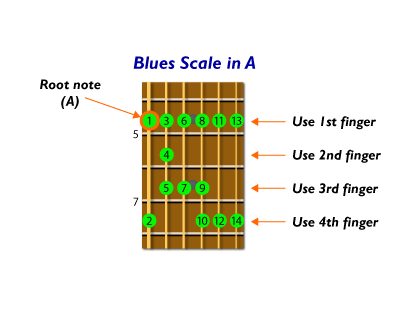
The Blues Scale

Here is a diagram that shows you how to play a blues scale on the guitar in the key of A minor. Learning how to play the blues scale on guitar is easy as it is basically the pentatonic scale with one extra note (the flatted 5th). This extra note in the blues scale makes a nice transitional voice to add a bit of tension to a melody. Below you can easily see the moveable scale shape, with the root being played by your first (1st) finger. Therefore, you can play a G minor scale by simply playing the same fingering and starting with your first finger on the low G note (low E string, 3rd fret)

How to Play a Blues Scale on Guitar

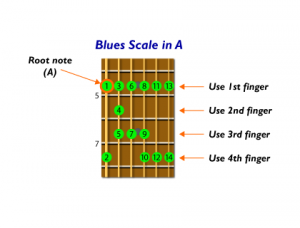
A movable first-position fingering that shows how to play a blues scale on guitar.

A helpful video taken from eMedia Interactive Rock Guitar.

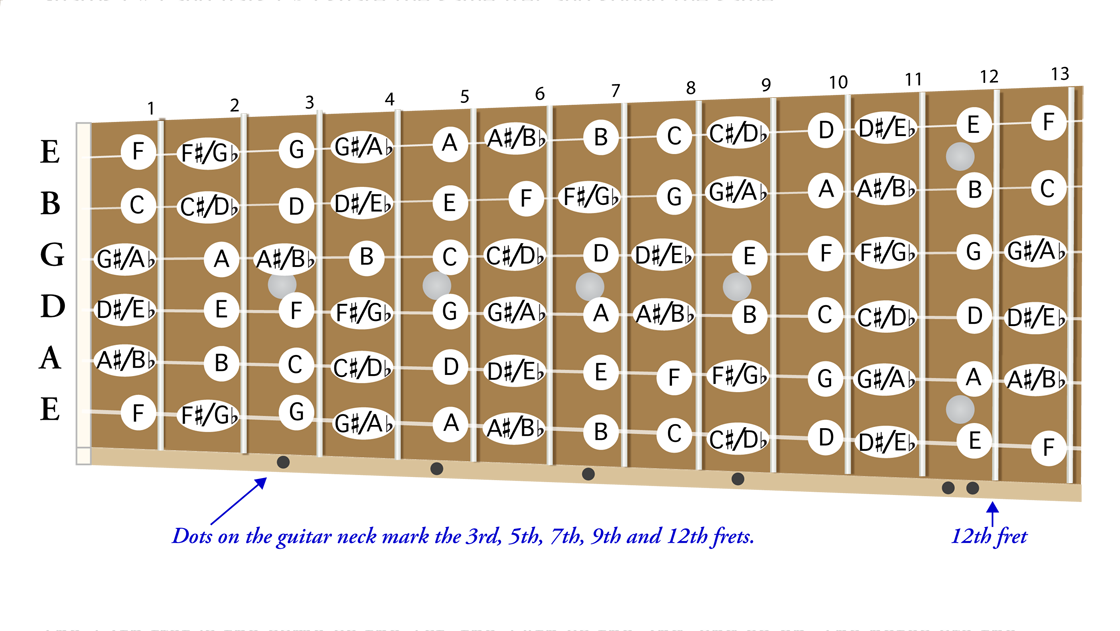
Learn Notes on the A String


How to Play Notes on the D String

This chart helps you learn guitar notes on the High-E string.