How to Tune a Guitar

open string names for how to tune a guitarThis article will show you how to tune a guitar using our free online guitar tuner below. This online guitar tuner can be used in any browser, including those found on a mobile device.

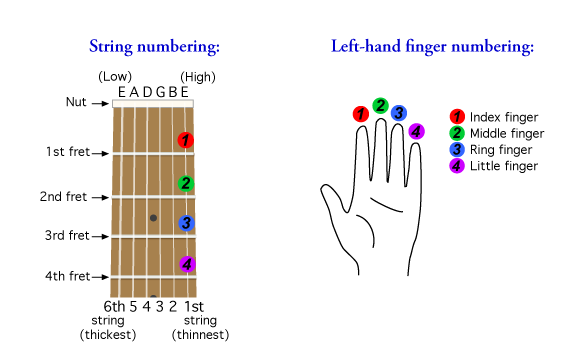
Start by learning the note names for the guitar strings in standard tuning. From the lowest (thickest) to the highest (thinnest) string, the notes are E-A-D-G-B-E. The phrase “Even Average Dogs Get Bones Easily” might help you remember the correct order as you learn how to tune a guitar in this lesson.

Steps for How to Tune a Guitar

  1. Click on a note name button in the guitar tuner (above) to hear the reference pitch for that guitar string.
  2. Play the corresponding string on your guitar and listen carefully to hear whether it sounds higher or lower than the reference pitch.
  3. Adjust the pitch of the string higher or lower until the sound you hear matches the reference pitch from the tuner.

Electric and Nylon String Guitar Tuner ExamplesGuitar Tuning Tips:
It’s best to start with the pitch a bit lower and tune the string up to the reference pitch. This helps keep the string from getting caught in the nut and going out of tune as you play.

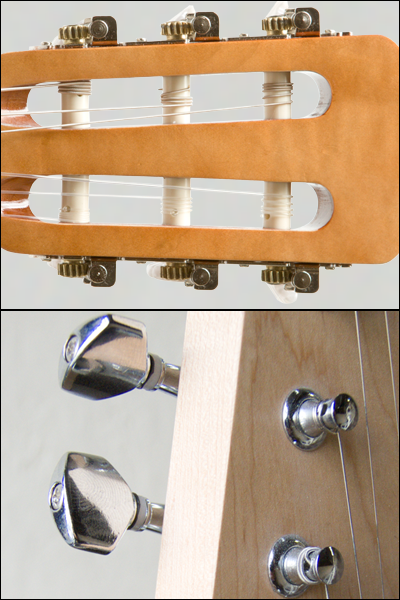
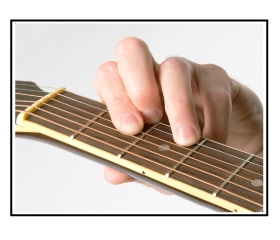
Make sure you know how to tune a guitar string higher or lower in pitch. To adjust the pitch of a string lower, simply turn the tuning key for that string towards yourself. Turn the tuning key away from yourself to raise the pitch.

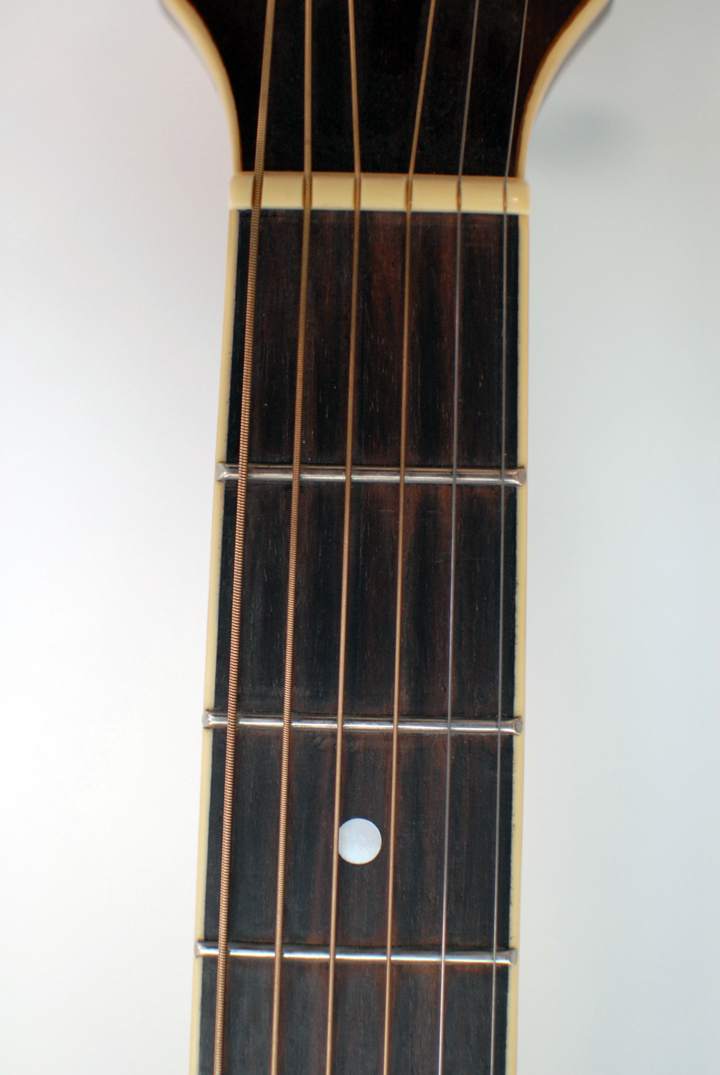
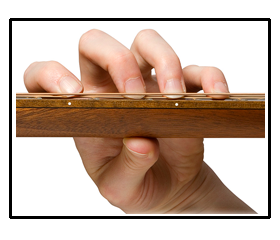
These instructions assume that your strings are wound around the tuning pegs in the standard direction. The pictures to the left illustrate how the string should be wound for steel-string and nylon-string guitars. To learn more about how strings should be wound see the how to string a guitar videos.

Other Types of Guitar Tuners

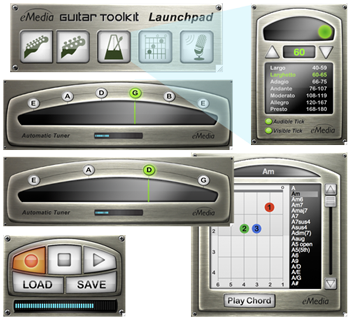
You’ve learned how to tune your guitar with our reference online guitar tuner. Next, you might want to try one of the other types of guitar tuners. A digital guitar tuner is the most popular option, as they detect the pitch and show you visually to tune up or down to get in tune with a high degree of accuracy. Note that eMedia’s intermediate and beginning guitar lesson software includes a wonderful digital guitar tuner, metronome, chord dictionary and audio recorder. Those guitar tools are also available as a standalone product for Mac and Windows as the eMedia Guitar Toolkit ($4.95). When you need a portable digital guitar tuner, there are products like the PitchBoy mini tuner that can fit on a keyring.

How to Tune a Guitar
using the Relative Tuning Technique

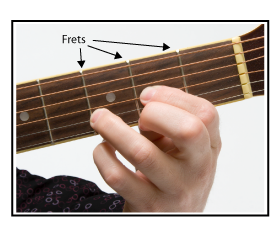
The relative tuning technique requires that one string is already in tune. Then you tune all the other strings to that string. To do this you must use your ear to match pitches, just as when you learned how to tune a guitar with the reference pitches above. You must also know which fretted notes are the same notes as the open strings you’re trying to tune.

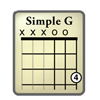
Alternate Guitar Tunings – Low, Drop D, Open G and Others

Guitar players often change the tuning of the guitar in order to get a particular sound or combination of notes in a chord. These tunings are called alternate guitar tunings. Sometimes this is simply changing all the open strings higher or lower by the same number of steps (low tuning), changing one string lower (as in drop D tuning) or tuning all the strings to an open guitar chord (as in open G).

How to String a Guitar

String Corrosion Example
A picture showing string corrosion near the nut. Notice the string discoloration.

Before we jump into how to string a guitar, let’s first cover a few guitar string basics.

Use the Right Strings – Before you purchase a new set of strings for your guitar, make sure you know what type of guitar strings your guitar uses. Electric and steel-string acoustic guitars are built for using metal strings, but they use very different alloys and gauges. Classical and folk acoustic guitars are made for nylon strings, and, again, there are different types. Installing the wrong strings could ruin your setup or, worse, damage your guitar. Also thick guitar strings (medium and heavy gauge) are harder to hold down. For beginning guitarists it is usually best to start with lighter gauge strings, and go heavier as your hands get stronger.
Always Change Strings When They Are Worn – Guitar strings should be replaced regularly. As metal guitar strings age, they become corroded. Some last longer than others, but all guitar strings tend to lose their brilliance over time. If your guitar strings are really old or worn out, your guitar will sound dead and be more difficult to tune. Corroded strings can also be harder on your fingers.

What Tools Do I Need to Change Guitar Strings?

As you learn how to string a guitar properly, these basic tools will make it easier:

Strings

You will need a new set of strings that are appropriate for your guitar and style (see the list of guitar and string types below).
Guitar Strings

String Winder (String Crank)

An inexpensive string winder (or string crank) is indispensable. Without it, you’ll have to crank the guitar tuning key with your fingers — a very tiring task! Professional guitar shops have to change strings so often that they normally use battery-powered string winders. A standard guitar string winder usually features a special slot for pulling up bridge pins found on steel-string acoustic guitars. You’ll find a standard string winder in the eMedia Guitar Accessory Kit. These look similar to the pictures to the right. These tools crank on the guitar tuning key so that the string wraps around the tuning machine and gets tuned up to pitch faster.

How to string a guitar tools - standard guitar string winder.
A standard string winder.

Wire Clippers

You don’t absolutely need a wire cutter, but without it you’ll end up with long tails on the end of each string that get in the way when you’re changing the other strings. Some companies make string winders with integrated wire cutters (see photo). Most wire cutters, snips, or pliers with snips will do the job. When clipping the end off the string try to leave about 1/2 inch.

How to string a guitar tools - String winder with string clipper
String winder with integrated clipper.

Steps for How to String a Guitar

For the step-by-step instructions on how to string a guitar like the one you own, please select the link below that corresponds to your guitar. These lessons will also have links to help you learn more about string types used for the individual guitar types.

How to String a Classical Guitar

Instructions for how to string a nylon string guitar. Useful for both classical and folk guitars.

How to String an Acoustic Guitar with Steel Strings

Here you learn how to change strings on a steel-string acoustic guitar. Be sure to read about acoustic guitar string types. Guitar string variations can greatly affect the sound and playability of your guitar.

How to Change Electric Guitar Strings

This gives you a great guide on how to string an electric guitar. To bend strings easier, select light gauge electric strings.

Tips for Changing Guitar Strings

Wash your hands before changing you guitar strings. Oils from your fingers make the strings corrode faster.

While your strings are off, you may wish to polish your guitar, particularly the neck and underneath where the strings are around the sound hole or pickups. You can remove the dust by wiping with a damp cloth. Remove dust by wiping with a cloth that has been sprayed lightly with guitar polish (also included in the eMedia Guitar Accessory Kit).

Basic Guitar Chords for Beginners

This free guitar lesson teaches you how to play basic guitar chords that use open strings. These chords will help you learn countless songs across pop, rock, blues, country, and other music styles. Most content is taken from the curriculum found in eMedia Guitar Method, the award-winning interactive guitar lesson software that teaches you to play with songs and interactive music technology that can even listen to the notes you play.

Tips for Playing Basic Guitar Chords

  • Make sure you know how to read guitar chord charts.
  • Your hand should be in a C shape, perpendicular to the neck, with space between the curve of your hand and the neck. Your thumb should be opposite of your middle finger.
  • Keep fingers arched and play with the tips of your fingers, to avoid accidentally muting other strings.
  • Notes should be played slightly behind the fret, but not on the fret. This requires less pressure and creates better tone.
  • Don’t push down on the strings with any more pressure than is needed to make the note(s) sound.
  • Don’t be frustrated if chords don’t sound right at first. It takes time to learn how to play guitar chords.
  • Chords can be strummed, or you can play the individual notes (called an arpeggio) to get a different sound.

How to Play Simple Guitar Chords

The chords below only require one finger to play. So if you are a totally new, beginning guitarist then you can start here and learn how to play easy chords on guitar before going on to learn the more difficult ones. They are the most basic guitar chords for beginners.

How to Play the Simple G Guitar Chord

How to Play a Simple G Guitar ChordStrum Simple G by playing three strings with either pick, fingers or thumb while holding the indicated string down behind the 3rd fret with your pinky (see video). Don’t press down too hard.

How to Play the Simple C and G7 Guitar Chords

How to Play a Simple C Guitar ChordHow to Play a Simple G7 Guitar ChordStrum the Simple C and G7 chords by playing three strings with either pick, fingers or thumb while holding the 1st finger as indicated in the chord charts. Be careful not to touch adjacent open strings with your left-hand finger.

How to Play a Simple Bm Chord

Playing the Simple Bm Guitar ChordThis Bm guitar chord is extremely simple to play.

How to Play Open Guitar Chords

These are the common first position, open chord voicings found in many styles of music. Although these are relatively easy chords, they are found in many great guitar songs. Try to play these versions instead of the simple versions as soon as you can.

How to Play an E Chord

How to Play an E Chord
Open E is a very powerful sounding guitar chord, the root of the chord is E and can be heard in both the lowest and highest strings. In addition, all strings are being played. This is also a fairly easy chord to play on the guitar, as your fingers are close together and do not need to stretch too far. Remember to play each string at a time to be sure you are not accidentally muting a string.

How to Play an Em Chord

Em Guitar ChordEm (E minor) is played the same way as E major, but you remove your first finger and let the open G string ring out. The Em is a very powerful sounding guitar chord due to all the open strings being used. Like all minor chords, it sounds a bit wistful and sad compared to a standard E chord.

How to Play a C Chord

How to Play the C Chord Here is the standard open C chord. Notice that by playing the extra lower strings that the chord sounds stronger and bolder than the simple version found earlier. This is because the C note (called the root of the chord) is being played on the lowest string.

How to Play D and D7 Chords

How to Play a D Guitar ChordHow to Play a D7 Chord on Guitar

Strum D by playing the four highest guitar strings. Some can remember the D chord easier by thinking of it as a triangle shape, with the D7 as an inverse of the triangle. Note that the video below also shows how to play the A7 chord.

How to Play a Dm Chord

Dm Guitar ChordTo play the Dm (D minor) chord, you use your first finger on the first fret of the first string, your third finger on the third fret of the B string, and your second finger on the second fret of the G string.

How to Play an A and A7 Chord

How To Play an Open A ChordHow to Play an A7 Guitar ChordThese chords use five strings, including the open A (which plays the root of the chord) and open E. Notice that you can play the A7 by simply lifting your second (2nd) finger.

How to Play an Am Chord

Am Guitar ChordTo play an Am (A minor) you basically take the E chord formation and move it over one string. Your first finger plays the first fret of the B string, the third finger plays the second fret on the G string, and your second finger is on the second fret of the D string.

How to Play a G Chord

How to Play an Open G Chord

Learning how to play guitar chords will sometimes require some finger stretches. However, after you master the chords and are regularly playing the guitar, then the chords become second nature. To play open G, you must stretch your 3rd finger to play the G note (the root of the guitar chord) on the 3rd fret of your low E string.

How to Play an F Chord

How to Play the F Chord

The F chord has a reputation for being very difficult to play on the guitar. This is primarily because it requires using your first finger to hold down two adjacent strings (the E and B strings at the first fret). This is called a partial barre. With regular practice you will be able to play this chord. As with other chords, be sure to play all the individual notes one-at-a-time.

Learn New Guitar Chords and Techniques the Easy Way

eMedia Guitar Method BoxNow you can take the fast track to improving your guitar playing with eMedia Guitar Method, which includes over 180 easy-to-follow guitar lessons created by University of Colorado-Boulder’s Kevin Garry, Ph.D.. It features interactive technology that can listen to you play, let you slow-down and loop difficult parts and helps you learn over 70 easy guitar songs. Learn to play hits such as Knockin’ on Heaven’s Door and Rock’n MeeMedia Interactive Rock Guitar, which concentrates on rock guitar techniques, is also available if you’re a beginning rock guitarist. If you’re really serious about guitar, the eMedia Guitar Deluxe bundle contains both eMedia Guitar Method and eMedia Intermediate Guitar Method.

Use Those Basic Guitar Chords You Just Learned!

Now that you have learned how to play basic guitar chords, you can start using them in some songs or learn how to use them within the CAGED guitar system to make even more chords.

Online Guitar Tuner

Use this free online guitar tuner to tune your guitar. Note that this online guitar tuner works on mobile device browsers too, so you can use it to tune your guitar anywhere.

To use this handy reference guitar tuner simply:

  1. Click on the button with the same name as the string that you wish to tune.
  2. Play that string on the guitar.
  3. Adjust the tuning machine (twist it away from you to make the pitch higher) until the string sound in tune.
  4. Repeat steps 1 through 3 until the tuner and string are at the same pitch.
  5. Repeat until all six guitar strings are tuned.


Tune Your Guitar Faster

For a full-featured digital guitar tuner that lets you tune visually, check out the eMedia Guitar Toolkit.

It takes the guesswork out of your tuning and also includes other valuable practice.

Guitar Toolkit

Features include:

  • Digital Guitar/Bass Tuner
    Play into your computer microphone or line-in and tune interactively with this highly sensitive guitar tuner. Reference tones are also included.
  • Metronome
    Complete with visual and audio click with tempos selectable by common tempo markings (Adagio, Presto, etc.)
  • Chord Dictionary
    Includes fingering charts and audio playback for over 250 guitar chords to make learning new songs easy.
  • Audio Recorder
    Record yourself and play it back for friends and family to hear!

Beware of Common Guitar Practice Mistakes

Here are some really common mistakes made by new guitarists. As you practice and learn how to play guitar please keep them in mind.

  1. Remember to tune your guitar first and warm-up your hands.
  2. Be patient. Mastering any instrument takes a lot of practice.
  3. Practice slowly and watch your hands to have good guitar technique.
  4. Practice with a metronome to have a steady feel for tempo and keeping the beat.
  5. Change your chords on the the beat. Better to play slowly in rhythm than fast and miss a chord.

Learn Faster with eMedia’s Interactive Beginner Guitar Lessons!

eMedia Guitar Method BoxGuitar lesson software such as eMedia Guitar Method helps you learn how to play guitar faster. It provides a mix of great beginner guitar lessons by qualified teachers from leading music schools, and interactive music technology that gets you playing quickly. The Animated Fretboard and interactive guitar notation lets you see which notes to play, while the software listens to you and displays whether you’re actually playing the right note. Plus you learn hit songs like Knockin’ on Heaven’s Door and Rock’n Me.

Tips for Practicing Guitar

Simply playing the same two songs over and over will not make you progress. Have a clear idea of what you need to practice. In general, consider putting time aside for these three areas:

  1. Improve guitar technique and strengthen your fingers. Remember that everyone needs to warm-up before playing and performing. Ways to do that effectively are to practice playing scales in different positions on the neck, changing between chords in common chord progressions, picking and fingerpicking, and playing in-tempo with a metronome. Start SLOWLY. Try to play CLEANLY without extra noise from accidentally hitting open strings, or accidentally muting notes by not holding down a note on the fret properly. Getting good tone will help make you a great player.
  2. Practice songs and repertoire. Once you are all warmed-up, now is the time to practice the songs you know. Don’t rush them, but make sure that you are cleanly changing chords, hearing all the notes, and playing it at tempo without pausing.
  3. Learn something new. Stretch yourself with a new technique, song, or musical style. Learn music theory and train your ear.

Learn Faster with eMedia’s Interactive Beginner Guitar Lessons!

eMedia Guitar Method BoxGuitar lesson software such as eMedia Guitar Method helps you learn how to play guitar faster. It provides a mix of great beginner guitar lessons by qualified teachers from leading music schools, and interactive music technology that gets you playing quickly. The Animated Fretboard and interactive guitar notation lets you see which notes to play, while the software listens to you and displays whether you’re actually playing the right note. Plus you learn hit songs like Knockin’ on Heaven’s Door and Rock’n Me.

The Guitar Numbering System for Strings and Fingers

As seen in the graphic below, there is a guitar numbering system in place that indicates which finger to play relative to the frets. See the guitar fingering chart below for more information on guitar fingering notation.

Guitar Finger Numbering System

Note: The dots on the side and face of the guitar neck are placed before the 3rd, 5th, 7th, 9th, 12th, 15th, 17th and 19th frets. The 12th fret has two dots. These dots help you find your way on the neck.

Lessons from eMedia Music use the finger and string numbering systems shown above.


How to Strum a Guitar

Strumming is used for playing chords on the guitar. You strum with either the thumb, index finger or all the fingers across the strings in an up and down motion. With any of the strumming styles, the right arm rests on top of the guitar and the usual place to strum is just behind (toward the bridge) or over the sound hole. For an electric guitar, which doesn’t have a sound hole, the strumming is done over the pickups. This video shows you how to strum a guitar.

Receive over 180 beginner guitar lessons in eMedia Guitar Method.

Simple Guitar Chords for Beginner Guitar Students

Sometimes one person’s easy guitar chords are not so easy when you are a beginning guitar student. That’s why we include simple guitar chords with eMedia’s beginner guitar lesson software. The simple guitar chord voicings use fewer strings so they don’t require as much effort. This is perfect for the small hands of young kids, or those who might have a hand or finger condition (such as arthritis, broken fingers, etc.).

First Guitar Chords

The guitar chords below are called simple guitar chords. They are perfect for beginner guitar lessons, as most of them only require a single finger and three strings to play. They are the most basic, easy guitar chords for beginners and work well for children with small hands, or others who might have problems playing full chords. Try playing them and remember to play all the notes in the chords.

Basic Guitar Chords for Beginners
Easy Guitar Chords Charts

Here are some videos to help you learn some of these beginning guitar chords and beginner guitar songs that use them.

How to Play a Simple G Chord

[Excerpt from eMedia Guitar Method]

Beginner Guitar Song #1: Play Brother John/Frere Jacques

Now use your simple G chord to play this classic folk song. Each slash (/) indicates a downward strum on the beat. If possible, play to a metronome click so that you can to stay on the beat.

Easy Guitar Song Brother John

How to Play Simple C and G7 Chords

[Excerpt from eMedia Guitar Method]

Once you master this beginner guitar lesson on chords, then make sure you know how to read guitar charts and go on to this free guitar lesson that teaches you more easy guitar chords. It also uses easy guitar chord charts and videos to help you learn even more chords easier.

Beginner Guitar Song #2: Play Skip to My Lou

Here is another song to try with the simple guitar chords you have learned.Skip To My Lou Guitar Chords

More Easy Beginner Guitar Songs

Once you have mastered the simple guitar chords, you can play several easy guitar songs. Here is a carefully selected group of 10 easy guitar songs for beginners!

How to Hold a Guitar Pick

To learn how to hold a guitar pick, try making a loose fist and put the pick between your index finger and thumb. Don’t let too much of the pick be exposed as you need to control firmly as you strum and play individual notes. Here is a video to show you how to hold a pick.

Keeping a minimal amount of pick exposed also keeps it from being caught in the guitar strings and coming out of your hand. When using a pick, alternate between down and up strokes, giving each note a separate stroke. Thus the first note would get a down stroke, the second an up stroke, the third down, the fourth up and so on.

Over 180 beginner guitar lessons are ahead for you with eMedia Guitar Method.

Fingerpicking – How to Fingerpick on Guitar

This is the technique widely used by classical and folks guitarists. Here your hand rests above the guitar strings with the thumb roughly parallel to the strings and the rest of your fingers curved and plucking the strings perpendicularly. Note that some rock guitarists will use fingerpicking too. When using fingers (playing fingerstyle), pluck alternately with the index (i) and the middle (m) fingers. Thus use i for the first note, m for the second, i for the third, m for the fourth and so on.

Over 180 beginner guitar lessons are ahead for you with eMedia Guitar Method.

Left Hand Guitar Technique

Here are some things to observe when developing proper left hand technique for guitar…

Play With Thumb Parallel to the Neck and Arched Fingers

Left Hand Guitar Technique for Open Chords - SideYour thumb should rest in the middle of the back of the neck, opposite your 2nd finger and vertical (perpendicular to the neck, not angled or parallel). Try holding your guitar neck with your left hand and then pull your hand down keeping your fingers slightly curved.

Keep space between the curve of your hand that is making the chord and the guitar neck. If you were to look at your hand from the end of your guitar (near the tuning machines), it should be in a “C” shape, with arched fingers.

Play On Your Finger Tips

Proper Left Hand Guitar TechniqueMake sure you play with the tips of your fingers, so that notes can ring out and not be accidentally muted. Do not let your finger flatten out when playing single strings.

There is generally a one finger per fret, rule, that says all notes played on a particular fret should be played by the same finger across all strings on that fret. For example, if the 1st finger is on the 3rd fret, it plays all notes on the 3rd fret across all strings, the 2nd finger plays notes across the 4th fret, the 3rd plays the notes across the 5th fret and so on. Then as you move your hand up and down the neck you always have maximum reach with minimal movement. Very important when playing melodies and riffs at higher tempos.

Play Slightly Behind the Fret, and Don’t Press Too Hard

Left Hand Guitar Technique for Open Chords - FrontYour fingertips should press down just behind the frets (slightly towards the tuning machine end of the neck), and as close to the frets as possible without having your finger on the top of the actual fret. This will make it much easier to hold down the string to get a good tone. You should not need to press down very hard to make a note sound. If the note sounds muffled, your finger is probably on the fret and you need to move it back a bit.

If your left-hand fingernails are too long, they may need to be trimmed.

Paying extra attention to technique as you learn how to play guitar pays off greatly as you start to improve. Getting the basics right during your initial beginner guitar lessons pays off a lot in the long run.

Learn Faster with eMedia’s Interactive Beginner Guitar Lessons!

eMedia Guitar Method BoxGuitar lesson software such as eMedia Guitar Method helps you learn how to play guitar faster. It provides a mix of great beginner guitar lessons by qualified teachers from leading music schools, and interactive music technology that gets you playing quickly. The Animated Fretboard and interactive guitar notation lets you see which notes to play, while the software listens to you and displays whether you’re actually playing the right note. Plus you learn hit songs like Knockin’ on Heaven’s Door and Rock’n Me.

Beginner Guitar Technique

Here are some good lessons on guitar technique designed to help the beginner guitarist get started the right way. Remember to watch your hands and fingers in the early stages. As you learn how to play guitar you don’t want to develop any bad habits. It is much harder to fix problems with your technique later.

Right Hand Guitar Technique

The right hand is used to make the guitar string vibrate by touching the string with your fingers, thumb and/or guitar pick. The right hand should rest comfortably on the guitar, with the hand basically parallel to the front of the instrument.  The main right-hand guitar techniques are:

How to Strum a Guitar

Strumming is used for playing chords on the guitar. You strum with either the thumb, index finger or all the fingers across the strings in an up and down motion. See video for a demonstration. With any of the strumming styles, the right arm rests on top of the guitar and the usual place to strum is just behind (toward the bridge) or over the sound hole. For an electric guitar, which doesn’t have a sound hole, the strumming is done over the pickups. This video shows you how to strum a guitar.

[Excerpt from eMedia Guitar Method]

How to Hold a Guitar Pick

To learn how to hold a guitar pick, try making a loose fist and put the pick between your index finger and thumb. Don’t let too much of the pick be exposed as you need to control firmly as you strum and play individual notes. Keeping a minimal amount of pick exposed also keeps it from being caught in the guitar strings and coming out of your hand. When using a pick, alternate between down and up strokes, giving each note a separate stroke. Thus the first note would get a down stroke, the second an up stroke, the third down, the fourth up and so on. Here is a video to show you how to hold a pick.

Fingerpicking

This is the technique widely used by classical and folks guitarists. Here your hand rests above the guitar strings with the thumb roughly parallel to the strings and the rest of your fingers curved and plucking the strings perpendicularly. Note that some rock guitarists will use fingerpicking too. When using fingers (playing fingerstyle), pluck alternately with the index (i) and the middle (m) fingers. Thus use i for the first note, m for the second, i for the third, m for the fourth and so on.

[Excerpt from eMedia Guitar Method]

Left Hand Guitar Technique

Here are some things to observe when developing proper left hand technique for guitar. Those are:

Play With Thumb Parallel to the Neck and Arched Fingers

Left Hand Guitar Technique for Open Chords - SideYour thumb should rest in the middle of the back of the neck, opposite your 2nd finger and vertical (perpendicular to the neck, not angled or parallel). Try holding your guitar neck with your left hand and then pull your hand down keeping your fingers slightly curved.

Keep space between the curve of your hand that is making the chord and the guitar neck. If you were to look at your hand from the end of your guitar (near the tuning machines), it should be in a “C” shape, with arched fingers.

Play On Your Finger Tips

Proper Left Hand Guitar TechniqueMake sure you play with the tips of your fingers, so that notes can ring out and not be accidentally muted. Do not let your finger flatten out when playing single strings.

There is generally a one finger per fret, rule, that says all notes played on a particular fret should be played by the same finger across all strings on that fret. For example, if the 1st finger is on the 3rd fret, it plays all notes on the 3rd fret across all strings, the 2nd finger plays notes across the 4th fret, the 3rd plays the notes across the 5th fret and so on. Then as you move your hand up and down the neck you always have maximum reach with minimal movement. Very important when playing melodies and riffs at higher tempos.

Play Slightly Behind the Fret, and Don’t Press Too Hard

Left Hand Guitar Technique for Open Chords - FrontYour fingertips should press down just behind the frets (slightly towards the tuning machine end of the neck), and as close to the frets as possible without having your finger on the top of the actual fret. This will make it much easier to hold down the string to get a good tone. You should not need to press down very hard to make a note sound. If the note sounds muffled, your finger is probably on the fret and you need to move it back a bit.

If your left-hand fingernails are too long, they may need to be trimmed.

Paying extra attention to technique as you learn how to play guitar pays off greatly as you start to improve. Getting the basics right during your initial beginner guitar lessons pays off a lot in the long run.

How to Hold a Guitar

It is important to hold the guitar properly while playing it. This can affect your arm and hand position which is crucial to get right when learning how to play the guitar. Hold the neck with your left hand and pluck or strum the strings with your right hand. Keep the guitar face nearly vertical with the top inclined slightly toward the body. If sitting, try to sit straight — avoid bending over the guitar. Settle into a comfortable position and stay relaxed. The type of guitar you have affects how you sit or stand with the guitar. Here are some examples of good ways to hold different types of guitars.

Holding a Guitar in Sitting Position

How to Hold a Guitar in Sitting Position with Acoustic Guitar

(right leg crossed over left)

Classical Position

How to Hold a Guitar in Classical Position

(Left foot on raised platform)

How to Hold a Guitar in Standing Position

How to Hold an Electric Guitar in Standing Position

(With guitar strap)

Now that you know how to hold a guitar, you can start learning how to play guitar the easy way with eMedia Guitar Method!